Free Download Magic and Easy Partition Manager for Windows 11, 10, 8, 7
The magic and easy partition Manager-AOMEI Partition Assistant Standard can help you to resize, merge, copy partition safely and easily.
Looking for free partition manager?
Managing the partition on your hard disk well is very important for keeping your PC at the best condition. Reasonable space allocation and correct configurations and settings help you to store and access your data smoothly and safely. But partition management involves so many aspects that most PC users feel confused. For instance, how to partition your disk? Which partition style you should choose?
Thus, many people are looking for a magic and easy partition manager to help them out. Here we will introduce a powerful yet free partition tool that are chosen by millions of Windows users-AOMEI Partition Assistant Standard. It provides the regular functions like create, delete, merge, recover, copy partition in Windows 10,8, 7, and other unique options for managing your partition and disk better.
Manage your partitions with free AOMEI Partition Assistant
Next, we will demonstrate you some noticeable features of this free magic partition manager, you can click the button to download it, and follow these contents to see how it works.
Content
1. Resize partition
Sometimes, you may encounter a problem on account of irrational allocation of space, like C drive is full while D drive is empty. As for this type of issues, you can use AOMEI Partition Assistant to resize your partitions. Here are the steps below.
✍Notes:
★ If you want to extend a partition, there has to be an unallocated space right after it. If there isn’t, you can shrink the partition closed to it beforehand.
★ The system partition can’t be moved to data partition.
★ This feature is also applied to resize encrypted partition.
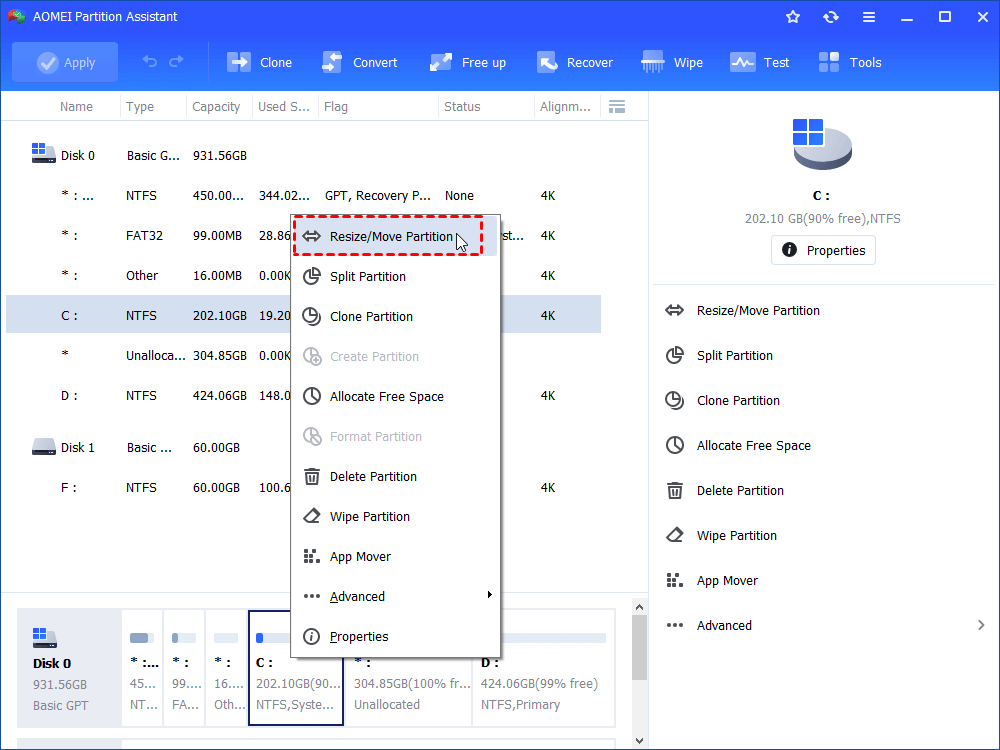
Step 1. Open AOMEI Partition Assistant, you will see all partitions and disks information listed on the main interface. From the screen, we can see there is an unallocated space after the C partition, right-click on the C partition, and choose “Resize/Move partition”.
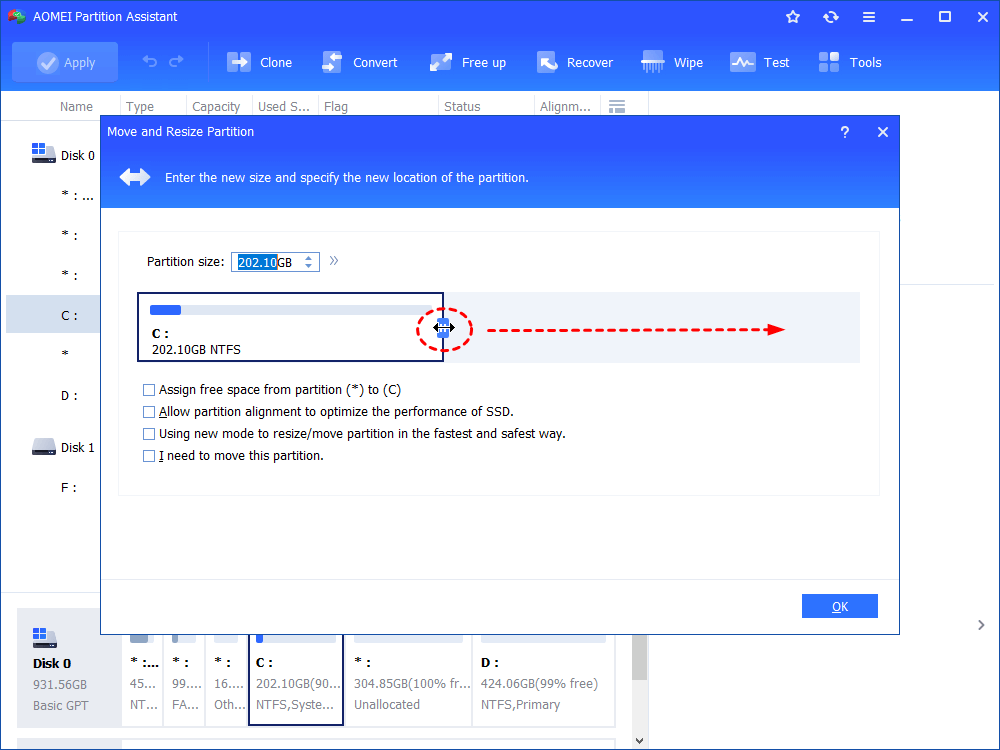
Step 2. In the small window, you can extend the partition size by dragging the border rightwards. And click “OK”.
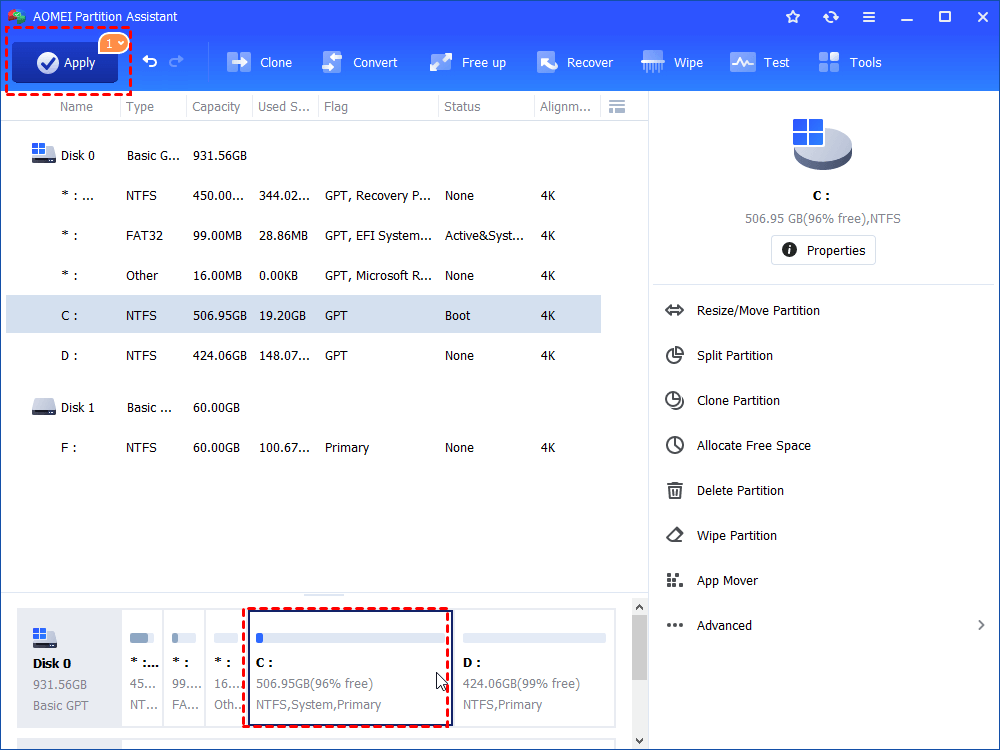
Step 3. Go back to the main interface, click the “Apply” and “Proceed” to commit the operation.
✍Notes:
-
The “Resize Partition” feature works only when the unallocated space is right behind the to-be-extend partition. If the unallocated space is not adjacent to the target volume, you can try the “Merge Partition” instead, which can add unallocated space into another partition, no matter where the unallocated space is in the disk.
-
Besides, this magic and easy partition manager also allows you to merge 2 partitions into 1 when one of them is running out of space and another one is almost full,. The steps are also simple.
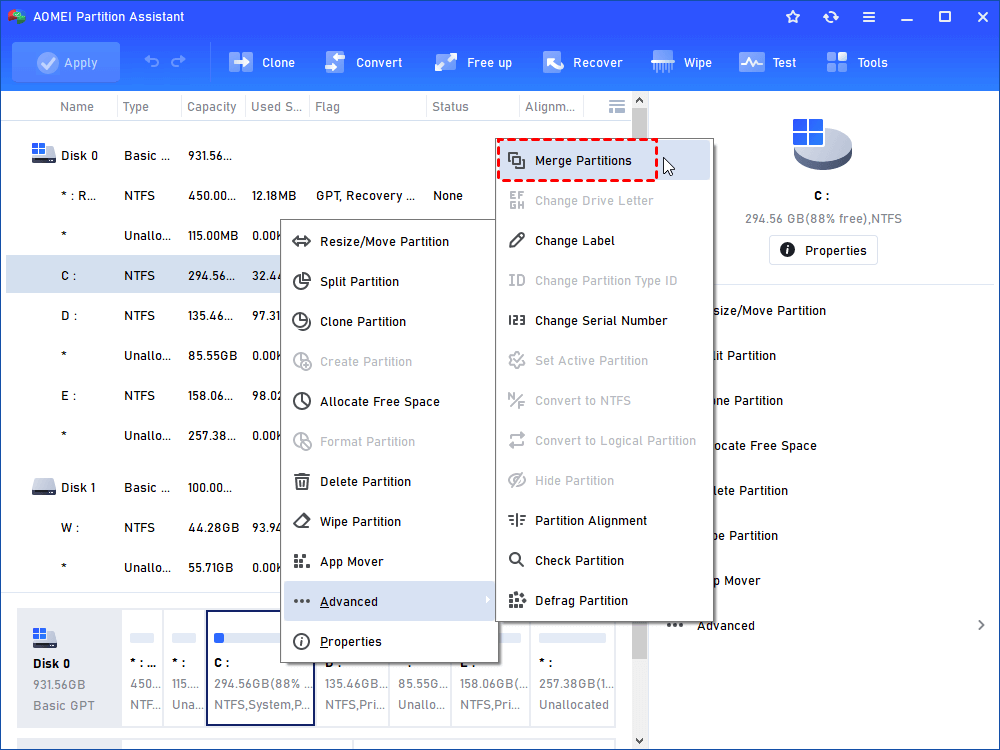
Step 1. Take merge c partition E as an example, right-click on C partition, find "Advanced" and select “Merge Partitions”.
Step 2. Choose the adjacent partition you want to merge, and click “OK”.
Similarly, you can preview the operation on the main console. And you also need to click “Apply” on the toolbar.
2. Copy partition
Copy partition is another important feature provided by AOMEI Partition Assistant. It can migrate one selected partition from one disk to another HDD/SSD. If you want to transfer or back up your important data, effectively, copying partition is very helpful for you.
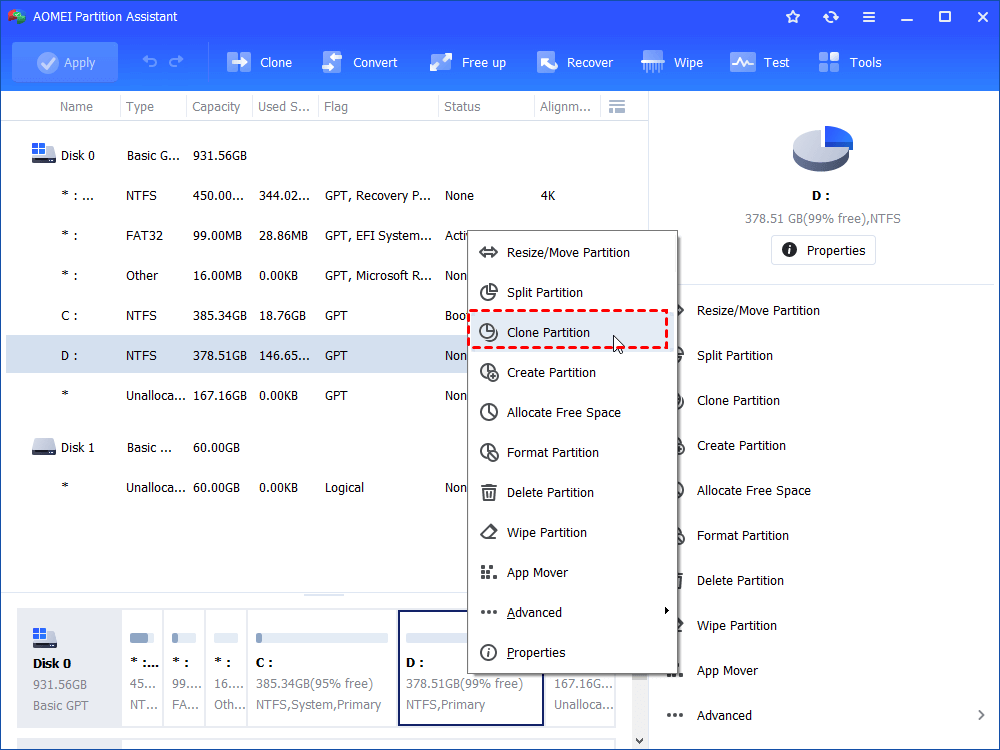
Step 1. Launch AOMEI Partition Assistant Standard, right-click the partition you want to copy, and choose “Clone Partition”.
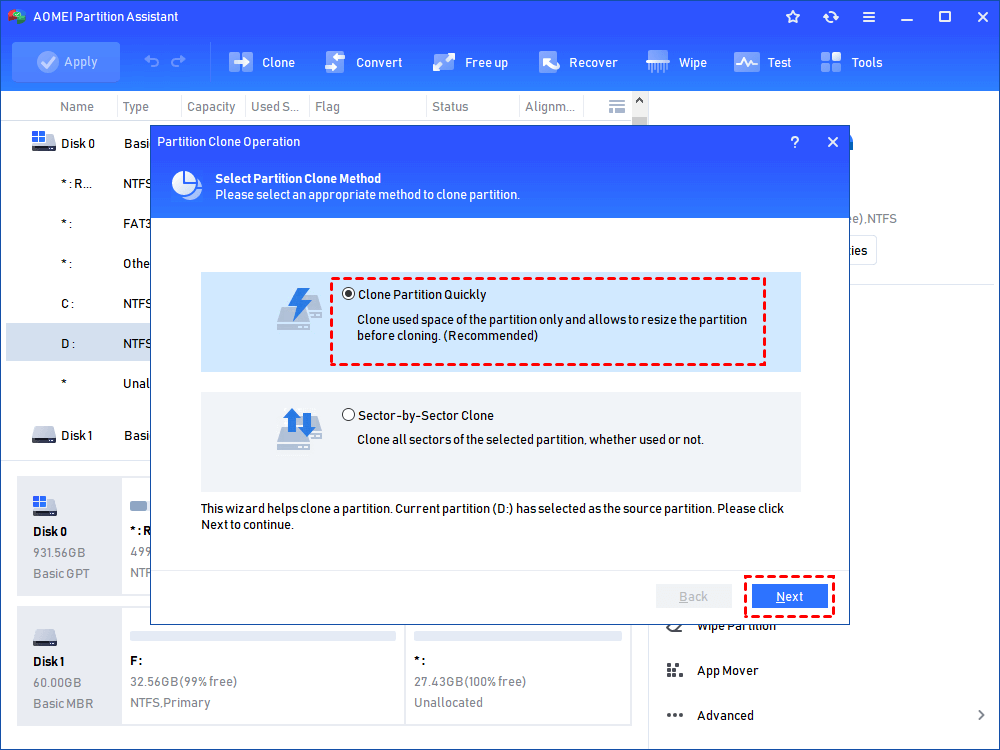
Step 2. There are 2 copy method offered, “Clone Partition Quickly” and “Sector-by-Sector Clone”. Generally, we choose the former, which only clone used space of the partition, and it is faster.
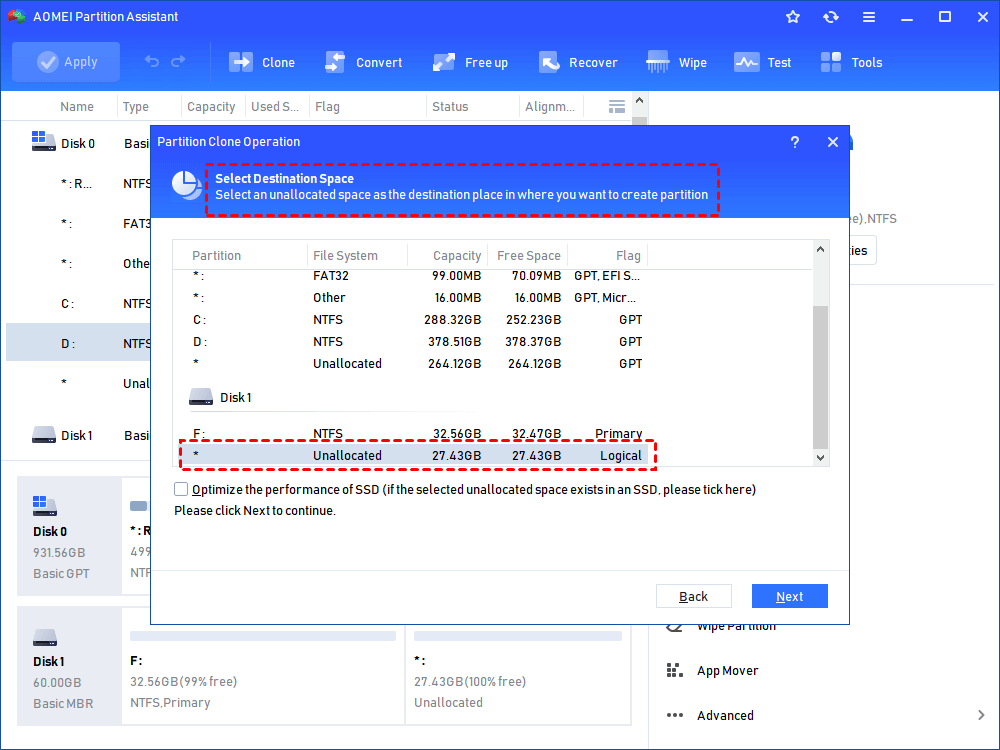
Step 3. Then select an unallocated space on the target partition, and click “Next”. If the target partition is from an SDD, you can check “Optimize the performance of SSD”.
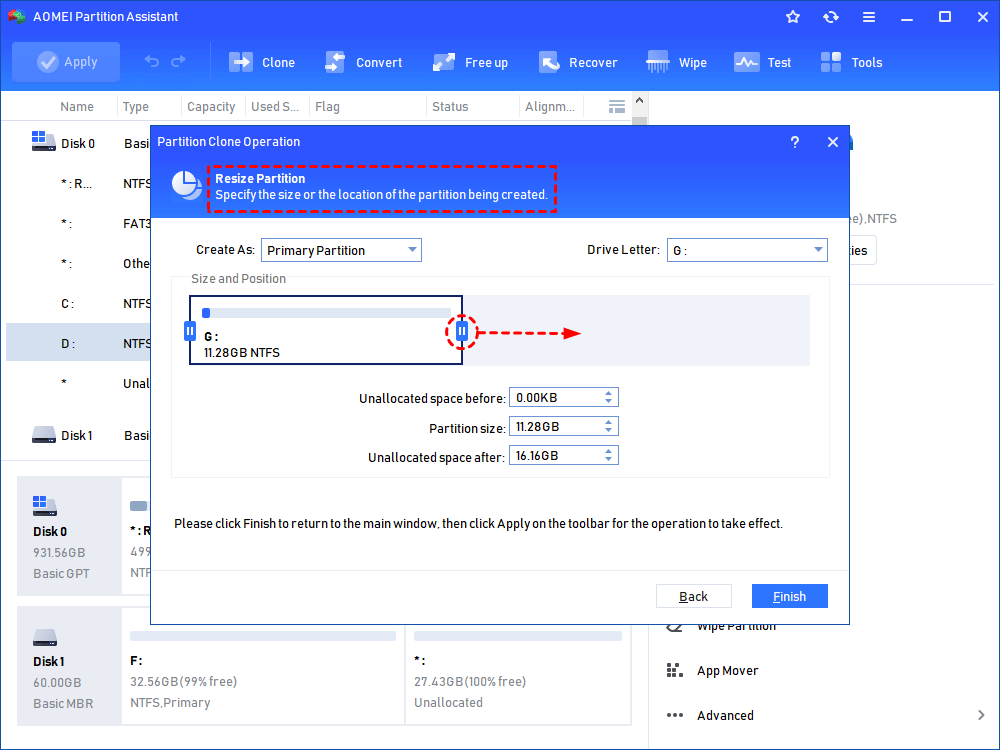
Step 4. Then you can decide the size of the partition being created. Then click “Finish”.
Then confirm the operation. In the main interface, click “Apply” > “Proceed” to start cloning.
✍Note: This partition manager supports not only copying a partition, but copy a whole disk to another place.
3. Create a portable partition manager
Sometimes, you may run into a boot problem making you PC unable to get started. You can use “Create bootable media” to create a portable partition manger with a USB flash drive, and this USB can boot your PC and fix your problem. Here are the steps.
Preparation:
• Attach a USB flash drive or other external hard drive to your PC.
• Back up your USB drive, because it will be formatted during the operation.
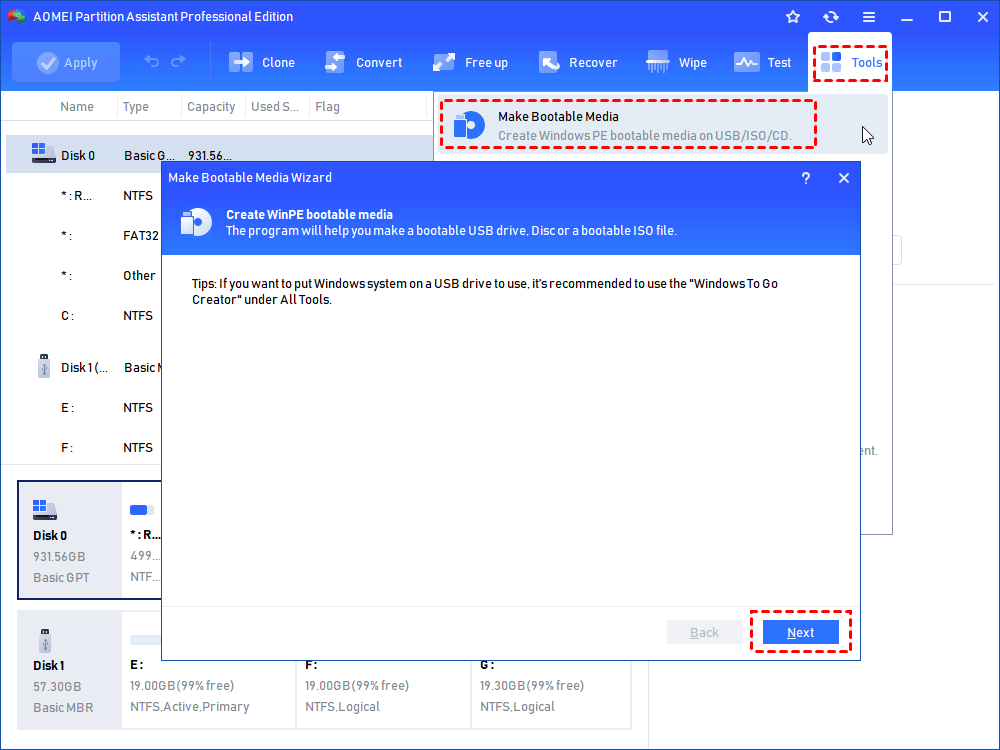
Step 1. Connect a USB flash drive to a working PC, and open AOMEI Partition Assistant. And click “Make Bootable Media”, click “Next” on the pop-up window.
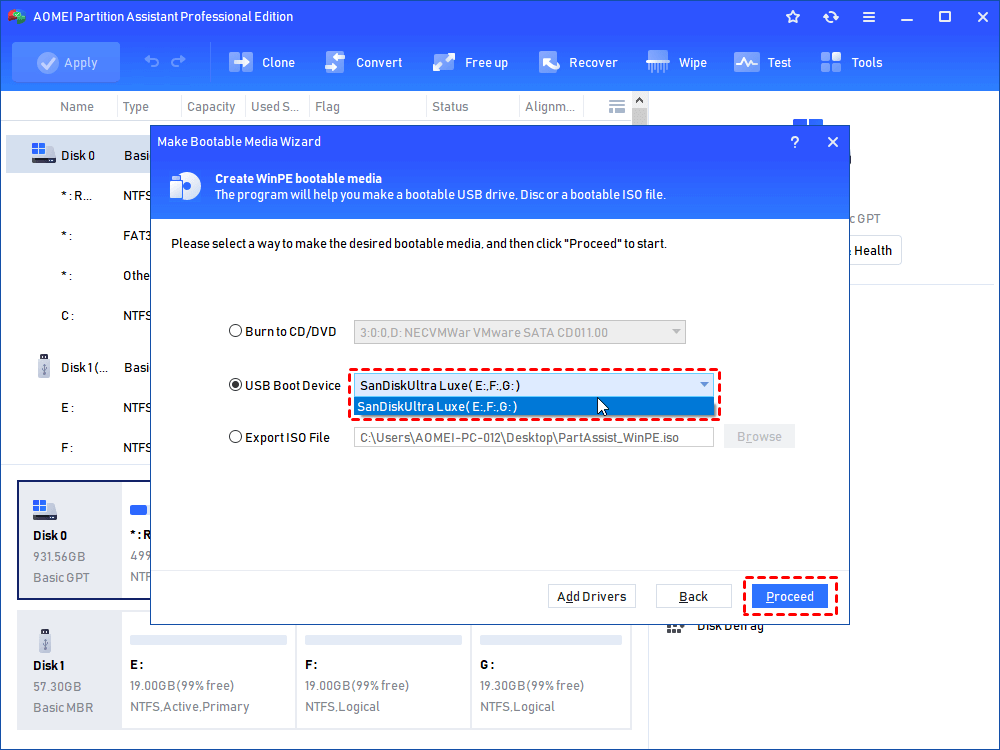
Step 2. Choose “USB boot device” and choose your USB flash drive, and click “Proceed” to commit this operation.
Once it gets done, the bootable USB drive will contain the preinstalled magic and easy partition manager. You can boot your PC from the USB and check your hard drive for errors, or use other functions of AOMEI Partition Assistant like formatting C drive, wiping system disk, rebuilding MBR, etc.
Advanced features provided by AOMEI Partition Assistant Professional version
Besides all the services mentioned above, there is the AOMEI Partition Assistant Professional Edition providing more advanced features for you, such as Allocate free space to assign free space from one partition to another.
Moreover, if you want to change properties of your disk and partition, like changing file system AOMEI Partition Assistant can also help you. We focus on how to convert file system between FAT32 and NTFS without data loss and convert dynamic disk to basic.
1. Convert FAT 32 file system to NTFS without losing data
Converting file system can help you a lot when a file system is not working well with your device. As we known, FAT 32 only supports the maximum partition capacity of 32 GB in Windows 10, 8, 7, and a single file can’t exceed 4GB, but compared with NTFS, it owns better compatibility to be used in some old system like Windows 98.
You probably notice that the Windows built-in tool, Disk Management can change FAT32 to NTFS, but it will delete all your data on your partition. But this partition manager pro version allows you to perform mutual change between FAT32 and NTFS without data losing.
✍Note: AOMEI Partition Assistant also can format a partition to other file system, including Ext2, Ext3, Ext4.
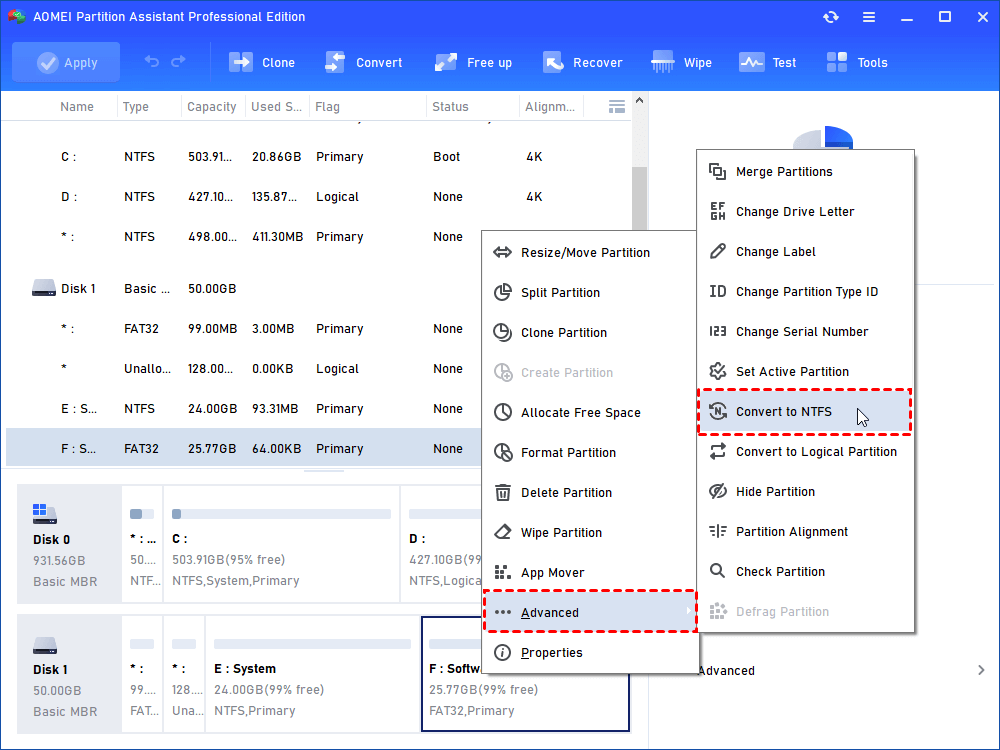
Step 1. In the main interface of AOMEI Partition Assistant. Right-click on the partition you need to convert, and choose “Advanced” in the drop-down menu, then click “Convert to NTFS”.
Step 2. Then click “OK” to confirm.
Step 3. Click “Apply” > “Proceed” in the interface, then the process will be started, and just wait for it to be done.
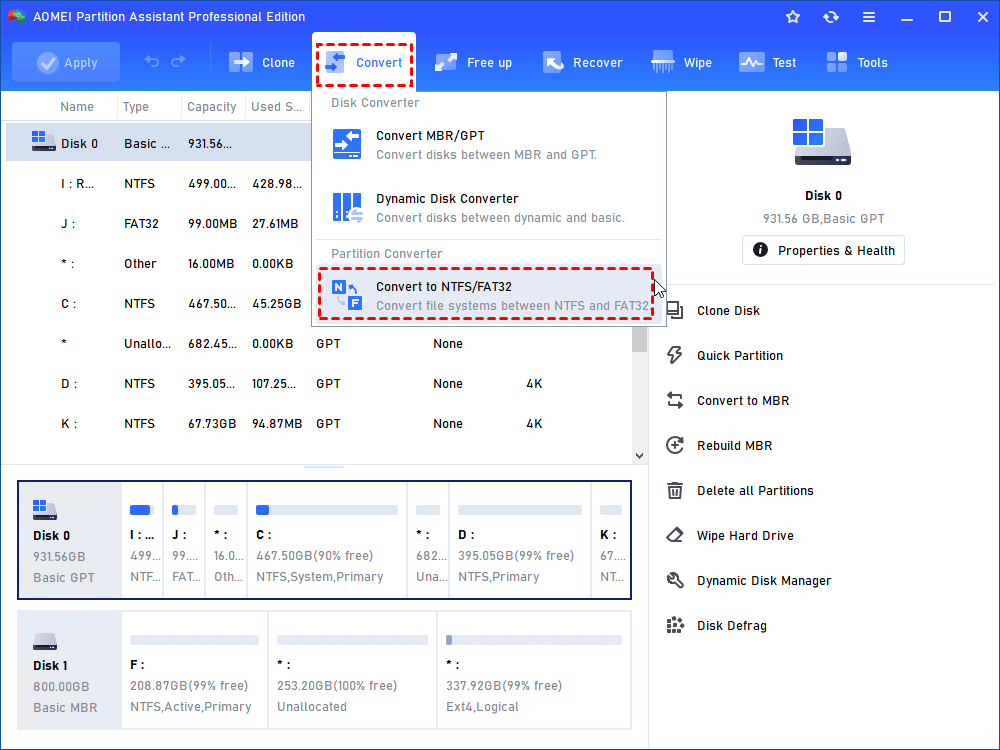
If you need to convert NTFS to FAT32 file system, click “Convert” > “Convert to NTFS/FAT32”, choose “FAT32 to NTFS”, and follow the instructions. Don’t forget to click “Apply” at the last step.
2. Convert dynamic disk to basic
Dynamic disk and basic disk are different sort of disk configurations used in Windows system. The 2 different disks employ different forms of organizing data files, and they have different features and compatibilities. And you can go the page: Dynamic Disk VS Basic Disk: Convert Basic to Dynamic/Dynamic to Basic Disk.
Because of the differences of dynamic and basic disk, you might need to change your disk between them, you can also use AOMEI Partition Assistant.
✍Note: We suggest you to make a backup with free AOMEI Backupper, because the data will be deleted during the conversion.
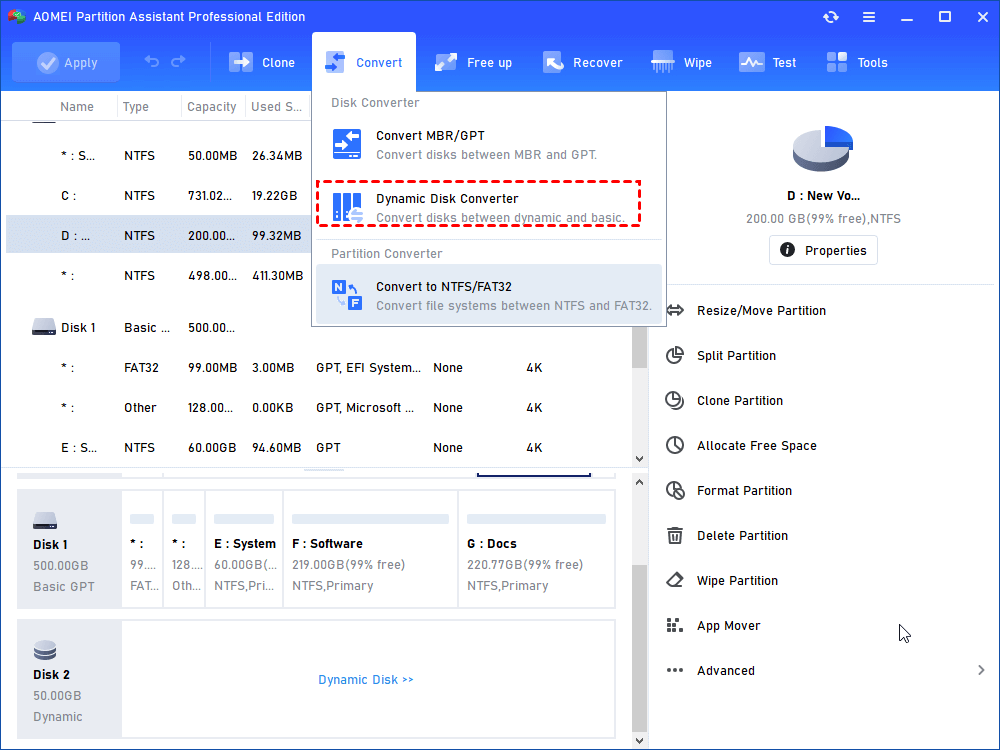
Step 1. In the main window, click “Convert” > “Dynamic Disk Converter”.
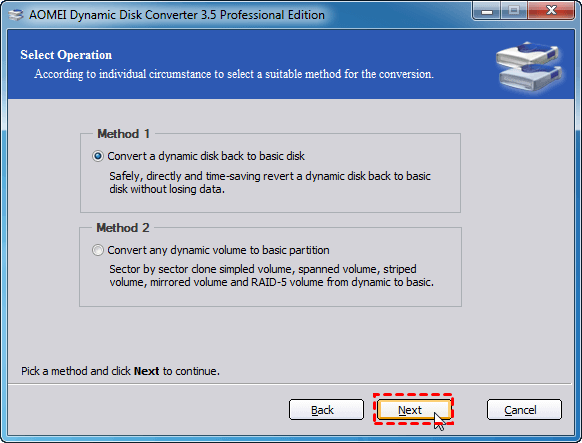
Step 2. Then you will see the AOMEI Dynamic Disk Converter launched, and click “Next”.
Step 3. There are 2 method of converting, “Convert a dynamic disk back to basic disk” and “Convert any dynamic volume to basic partition”. Choose one according to your need.
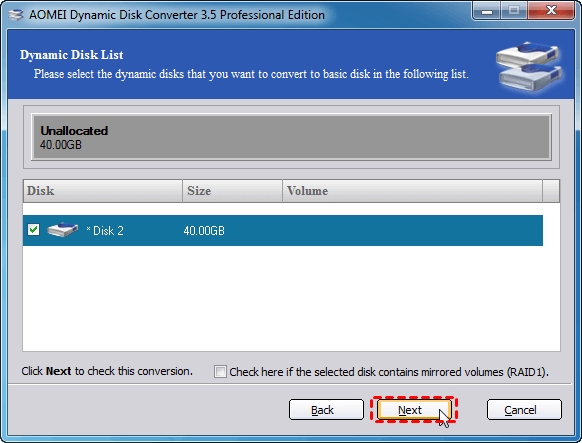
Step 4. Then select the disk you want to convert to basic, and follow the rest prompts to finish.
When the operation is over, your computer will be automatically restarted to ensure that the change has taken effect.
Conclusion
We can see that the magic and easy partition manager-AOMEI Partition Assistant can help a lot manager your disk and partition in Windows 10, 8, 7. And it has more functions that we can’t provide a whole detailed description of them, you can go to this edition comparing page to know more.
Note: All the operation can be performed well in most Windows systems. But if your PC are running with Windows Server, you can turn to Server edition which is specialized for Server system.

