Windows To Go
Windows To Go is a new feature in Enterprise Windows 8 or 8.1 which allows you to build an image of your Windows 8/8.1 to a flash USB drive and then you can boot it on any computer.
For home users, Windows To Go can make your home and work use of PC separately if you have only PC at home. In this way, you can use your working environment from a USB drive at home each day and there is no effect between your home use and working.
Besides for business Windows To Go makes “BYOD (bring your own device)” be possible. It is easier and safer for employers and employees to work. Because for employers Windows To Go insures less malware or viruses which may permeate business Network and employees use Windows 8 or 8.1 for their work only. Therefore, employees can freely choose the version of operating system without worrying the overlap of personal and work use or the inconvenience of bring work home.
Note:
- Windows To Go can be booted on any computer. When it is first booted on a host computer, all hardware may be checked by it and then install any demanded drivers. After this, when Windows To Go boots on that host computer again, it will recognize the host computer and load the correct drivers automatically.
- Make sure the allocations which you want to use on Windows To Go supports roaming.
How to Create a Windows8/8.1 To Go Drive within Windows7?
For the users of Enterprise Windows 8 or Windows 8.1, it is very easy for them to create Windows 8/8.1 Windows To Go drive. But if you don’t own Enterprise Windows 8/8.1, such as your system is Windows 7, how can you do? Buy Enterprise Windows 8/8.1 or use troublesome and complex command line. May be both of them are not the best choice for you, because there is a more easy way for you: using free third party software.
AOMEI Partition Assistant Standard is free partition management software. It can help you create a Windows 8/8.1 To Go drive within Windows 7. Besides Windows 7, you can also create a Widows 8/8.1 To Go drive within Windows Vista or Windows XP.
Detail steps for create a Windows 8/8.1 To Go drive within Windows 7
Before you do:
- You need to prepare a 13 GB or larger USB drive. Also, it could be external USB hard drive.
- You need to prepare a Windows 8 installation disc or ISO file.
Step1: Plug the USB drive into a USB 3.0 or USB 2.0 port on the PC. Make sure that it is detected by your machine.
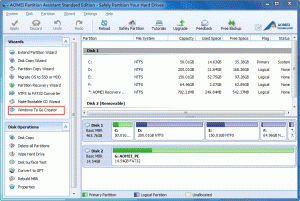
Step2: Download, install, and launch AOMEI Partition Assistant. The program will automatically display your USB drive, and here is Disk 2. Then, click “Windows To Go Creator” in the left side.
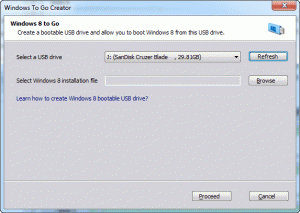
Step3: In the pop-up window, click “Browse” button to select Windows 8 installation file (named install.wim or install.esd) If the program doesn’t detect it automatically, please click “Browse” to select manually. After that, click “OK” to continue.
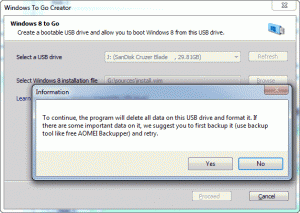
Step4: Click “Proceed”. The program will inform you about something important. The data on this USB drive will be deleted and the partition on USB drive will be formatted as NTFS file system. To back up data, free AOMEI Backupper is recommended. After clicking “Yes”, creating Windows 8 bootable USB drive will begin.
Note:
- The larger the USB drive is, the better the result will be. Meanwhile, certified USB 3.0 drives coming from vendors like IronKey, Kingston, Spyrus and others are recommended.
- If you have a Windows 8 installation disc, you can directly insert it in CD/DVD-ROM and then continue.
- If you have or download a “Windows 8 installation ISO” file, please extract it to a proper place with WinRAR or WinZIP, or mount it as virtual drive by using 3-rd party ISO mounting or burning software such as DAEMON Tools Lite.


