[2 Solutions] Extend Volume Greyed Out on Windows Server 2012 (R2)
Please read this post to learn how to extend partition successfully when the "Extend Volume" greyed out on Windows 2012.
By Dervish / Updated on December 21, 2023
"Extend Volume" greyed out on Windows Server 2012
I have a Windows Server 2012 R2 with C: and D: drives on the same disk. With more and more programs installed and data added, the C: drive is running out of free space, but D: drive has a lot of free space. I freed up 100 GB unallocated space from the D: drive using the Disk Management "Shrink Volume" option and tried to add it into C: drive. But the "Extend Volume" option on the C: drive is grayed out and disabled."

Why “Extend Volume” greyed out on Windows Server 2012?
Compared with previous Server versions such as Windows Server 2003 and 2000, Windows Server 2012 and Windows Server 2012 R2 can resize partition or re-partition a hard drive more easily because it is equipped with an improved Disk Management, which adds “Extend Volume” and “Shrink Volume” options. However, the “Extend Volume” feature only works when the partition you want to extend meet the following two conditions simultaneously:
✦ The target volume must be followed by a contiguous unallocated space.
✦ The target volume must be formatted with NTFS file system.
If there is no adjacent unallocated space or the partition is formatted with FAT32 or other file systems, you will meet the “Extend Volume greyed out on Windows 2012” problem like the above user.
How to fix "Extend Volume" greyed out issue on Server 2012
There are two solutions to solve the “Extend Volume” greyed out issue on Windows Server 2012, check them out and choose a proper method based on your situation.
▶ Solution 1. Delete the volume behind the to-be-extended partition
First, you can delete the partition (here is E), which is right after the to-be-expanded partition, to create an adjacent unallocated space. But that will delete all data on the E drive, so please backup the partition beforehand. Then do as the instruction:
Step 1. Open Disk Management tool, right-click on the E: partition and select "Delete Volume" in the drop-down list.

Step 2. Once you have deleted E: partition, it will turn into an unallocated space and be automatically merged with other unallocated space next to it. Now you can right-click on the C: drive and the "Extend Volume" option is available.

Step 3. In the "Extend Volume Wizard" window, you can input the amount of space in MB to add into C: drive. To finalize the modifications, click "Next".

You can use the rest of unallocated space to re-create D: partition and then restore data.
▶ Solution 2. Merge non-adjacent unallocated space into the target volume directly
The first solution requires you to back up partition (E), delete partition (E), extend partition (C) and restore data. This is quite time-consuming and easy to cause data loss. To avoid all the troubles, you can run a Server partition manager like AOMEI Partition Assistant Server. Please download the demo version to see how to fix extend volume greyed out on Windows 2012.
- ★For unallocated space is not adjacent to the target partition, it provides two fixes:
- One is moving the unallocated space to the right side of the to-be-extend partition via the “Move Partition” feature, which can make an unallocated space contiguous.
- While another one is directly merging the non-adjacent unallocated space into the target volume via the “Merge Partition” function. We prefer the second fix and show you how to do it step by step.
Step 1. Install and launch it. Right-click on the partition (here is C: drive) you want to extend and choose “Advanced” and select “Merge Partition”.

Step 2. In the pop-up window, check the box before unallocated space which means that the unallocated space will be added into C: drive. And then click “Next” button to continue.

Step 3. Now you can preview the unallocated space behind D: partition is added into C: drive. To make the changes come into effect, click “Apply” and "Proceed".

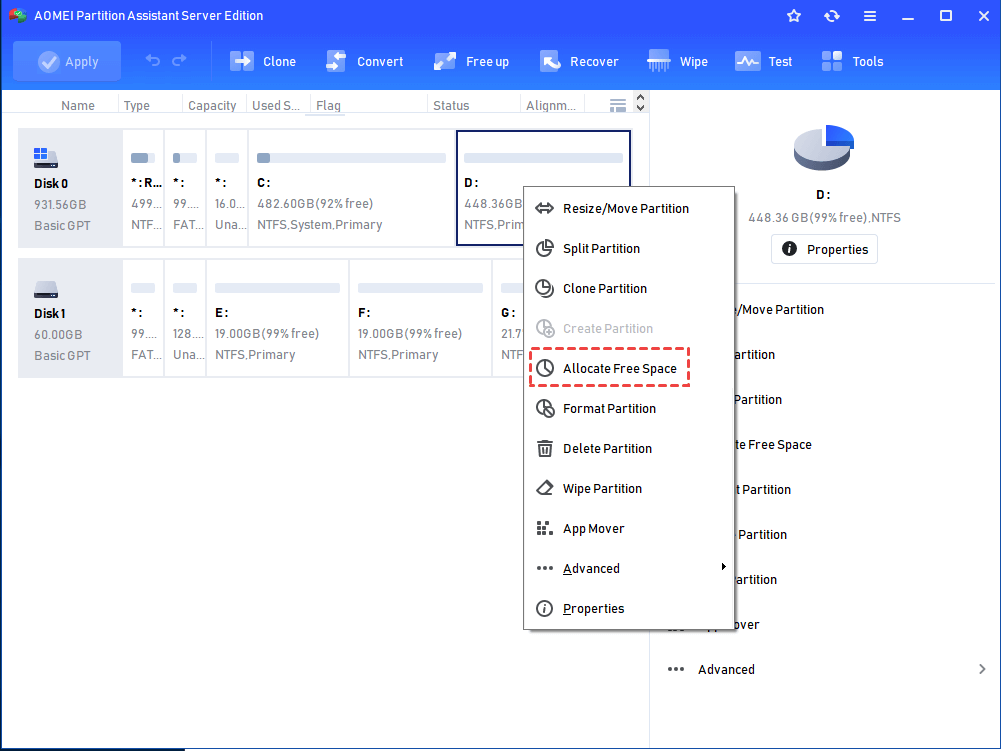
If there is no unallocated space on the same disk you want to extend, you can move free disk space on Server 2012 by "Allocate Free Space" feature that can allocate free space from one partition to another.
Summary
With those two solutions, you can easily solve the “Extend Volume” greyed out on Windows 2012. Apparently, AOMEI Partition Assistant Server offers an easier and safer solution. Besides, it also comes with many other amazing features that Server 2012 Disk Management does not provide, such as converting MBR to GPT on Windows Server without deleting volumes (vice versa), cloning partition, checking partition for errors, splitting a large partition into two smaller ones, etc.
There is an Unlimited Edition for you if you want unlimited usage within one company. And there is a great function, "Create Portable Version" is available in AOMEI Partition Assistant Unlimited. The function enables users to create AOMEI Partition Assistant to a removable device so that users can directly run it on the target computer without installation.