Effective Four Ways to Remove Write Protection from Hard Drive
You can learn how to remove write protection from hard drive in this article when you are unable to format your hard drive or modify files on it due to write protection.
By Bryce / Updated on November 10, 2023
Content
Need to remove write protection from hard drive
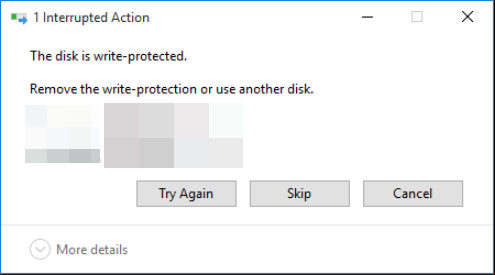
“I have 1TB Seagate external hard drive connected to my computer that Windows 10 is installed on. I failed to copy files on the external hard drive under Windows 10 with a message saying that the disk is write-protected. Remove the write-protection or use another disk. I clicked on “Try Again” button and this error still appeared. I really need to copy and delete these files to get free disk space on my C drive. I’m wondering what is write protection on my external hard drive and how to remove write protection from it in Windows 10?"
About write protection
Write protection, also named as read-only, it can be virtual or physical. When your hard drive or other storage devices like USB flash drive are enabled with write protection, you will not be allowed to make any write operation to it. Such as, it is unavailable to delete files on it or store new files on it. And you are only allowed to read the data already stored on it. That is to say, if your disk is write-protected, data loss on it caused by correct operations can be avoided.
To prevent serious ptoblem on hard drive, you can check your hard disk via Windows CHKDSK.
CHKDSK is a Windows built-in utility, which can check the integrity of your hard disk and fix file system errors on FAT16, FAT32, and NTFS drive. You can run it to check your hard drive for bad sectors.
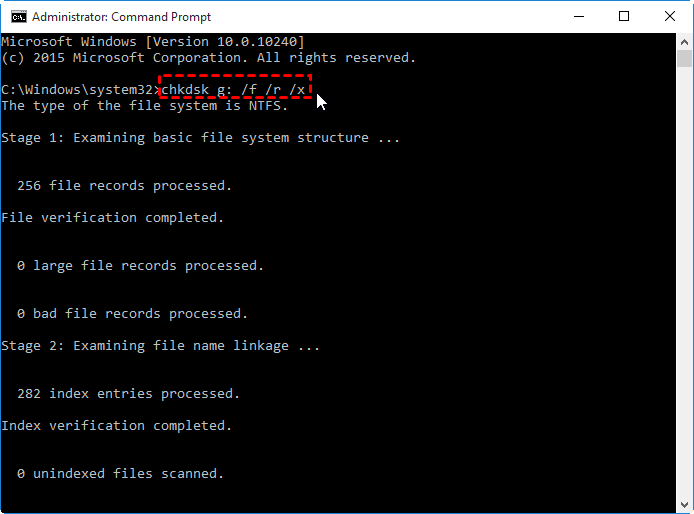
1. Run CMD as administrator.
2. Type chkdsk e: /f and hit “Enter” key.
(“e” is the drive letter of your hard drive partition)
If you are unable to run this command and receive message error that Windows cannot run disk checking on this volume because it is write-protected, you can try the following command:
chkdsk X: /f/r/x and press “Enter” key. “X” can be replaced with your hard drive partition drive letter. If you are still troubled by write protected issue, find a solution in the content below.
How to disable write protection on hard drive?
In general, disk write protected can be caused by virus attack or infection, corrupted file system and wrong value of Windows Registry Key, etc. If you are troubled in this issue, consider whether there are chances that your hard drive is infected with virus and run anti-virus software to check for it. If you are sure that there is no virus on your hard drive, you can try the solutions presented in the following part.
1. Clear write-protection from hard drive via Diskpart
This method is applied to the situation that the attributes of your hard drive has been set as read-only in Diskpart. The steps are listed as follows:
1. Press “Windows + R” at the same time to open “Run” dialogue.
2. Type “diskpart” and hit “Enter” key.
3. Type the following command lines and hit “Enter” after every command line.
list disk
select disk n (“ n” is the disk number of your hard drive)
attributes disk clear readonly
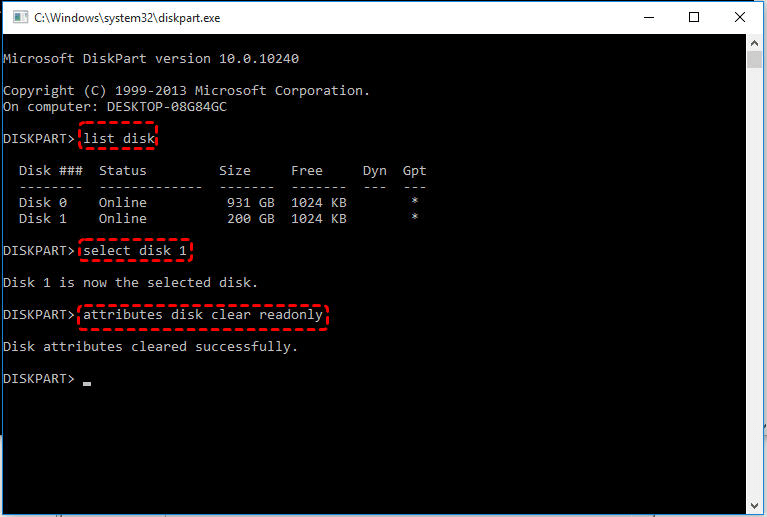
Within a few seconds, Diskpart utility cleared Read-only successfully. Then you can type “exit” and hit “Enter” to close this window.
2. Remove read-only with editting Windows Registry Key
When the value of Windows Registry Key is set incorrectly, you can remove write protection using Registry Editor.
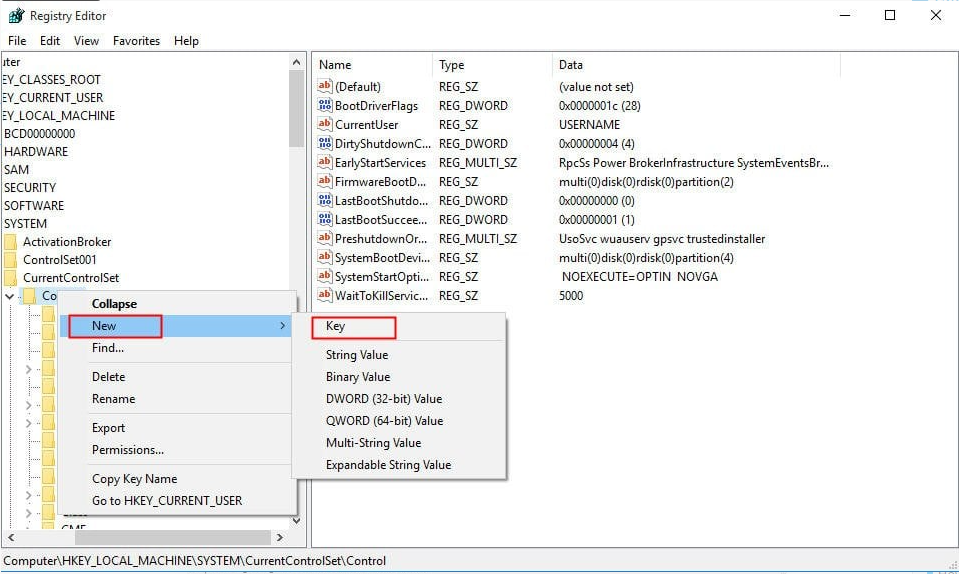
1. Type “regedit” in Run dialogue.
2. Navigate to the path below:
Computer\HKEY_LOCAL_MACHINE\SYSTEM\CurrentControlSet\Control\StorageDevicePolicies
3. Double click WriteProtect and Changethe value data from 1 to 0. Then, click “OK”.
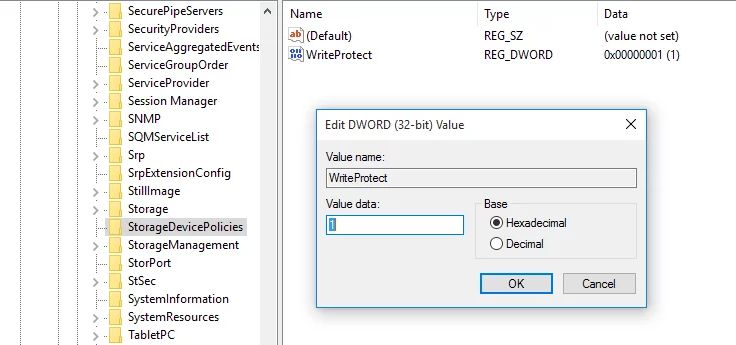
At the right-hand pane, right-click white space and go to “New”>“DWORD (32-bit) value”. Name it with Write Protect and open it to set the Value data to 0.
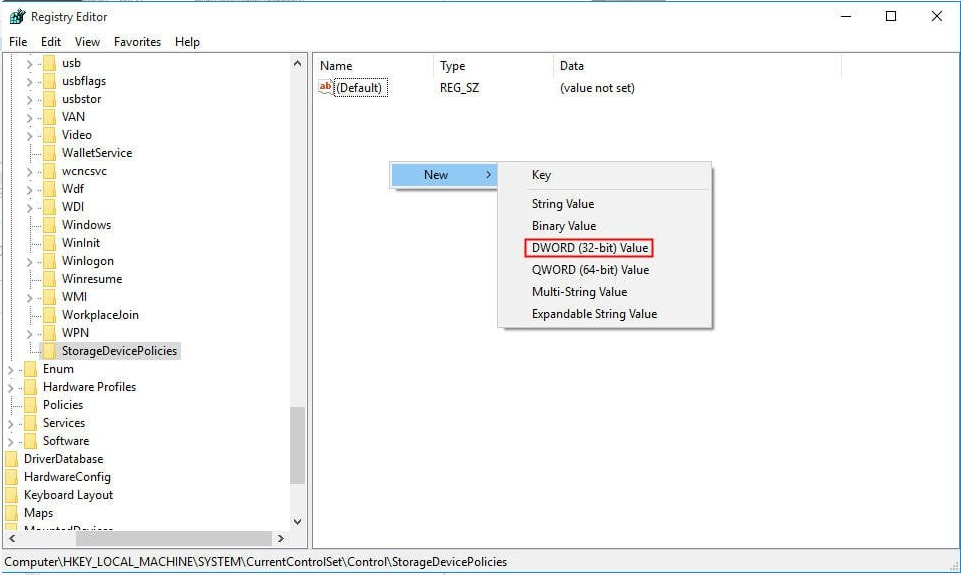
4. Close Regedit Editor and check whether the write protection is removed.
3. Format write-protected hard drive via partition manager
If your disk write-protected error is caused by corrupted file system, you can remove write protection on hard drive via formatting. Here free partition manager – AOEMI Partition Assistant Standard can be your choice, which is able to be applied under Windows 11/10/8.1/8/7, XP and Vista. Free download it and see how it works. And you should back up your data on the external hard drive before formatting as this operation will erase all data on it.
Step 1. Install and open AOMEI Partition Assistant. Locate the hard drive partition, right-click it and select “Format Partition”.

Step 2. In this small pop-up window, determine the file system of your hard drive. Then, click “OK”.

1. It is available to add Partition Label to your hard drive partition as long as you like.
2. Change cluster size is allowed as well. But it is advised to adopt the default cluster size.
Step 3. In the main interface, confirm your operation and click Apply >“Proceed” to perform it.

Conclusion
The issue that the disk is write-protected can be solved using corresponding methods based on different causes. After removing write protection from hard drive, you’ll be able to copy files to it, delete or modify files on it.
FAQs about how to remove write protection from hard drive
What is write protection on a hard drive?
Write protection is a feature that prevents data on a storage device, such as a hard drive, from being modified, deleted, or overwritten. It is often used to safeguard important files or prevent accidental changes.
How do I change permissions to remove write protection?
On Windows, you can right-click on the drive, select "Properties," go to the "Security" tab, and adjust the permissions to allow write access. On macOS, you can use the "Get Info" option and modify the permissions under the "Sharing & Permissions" section.
Can I remove write protection from a hard drive on a Mac?
Yes, the process is somewhat different on macOS, but you can change permissions and modify settings to remove write protection. Refer to the "Get Info" section mentioned earlier or use the "sudo chflags nouchg" command in the Terminal.
What precautions should I take before attempting to remove write protection?
Before making any changes, ensure you have a backup of important data on the hard drive. Changing settings or using third-party tools carries some risks, and having a backup helps protect your data in case something goes wrong during the process.