How to Partition External Hard Drive without Losing Data?
In this article, you will learn how to partition external hard drive without losing data as well as the reasons of partitioning external hard drive.
Why partition an external hard drive?
Nowadays, external hard drive such as hard disk drive or SSD, is the popular extended storage media in our life. For its large capacity, permanent storage, easy to carry and other features, they are widely used to store important data and files, system backup images. To manage your data better, you can partition your external hard drive first. Besides, you might need to partition the external hard drive for the following reasons.
1. If you use a brand new external hard drive on a computer, its drive letter will not appear on the computer when you connect it to your computer. At first, you must initialize disk before the logical disk manager can access it. And then partition the external hard drive in your need. If you create several partitions on external hard drive and put different kinds of data into different partitions. you can find the necessary items more efficiently.
2. Partition external hard drive can easily satisfy your specific requirements. In order to ensure the security of data, you may want to encrypt the data. As you know, encryption will slow down the performance of your computer. However, you can just encrypt a certain partition and keep other partitions unencrypted to ensure your computer run faster.
How to partition external hard drive without losing data?
To partition external hard drive, there are two methods for you. You can use Windows’ built in Disk Management or use a third party disk partition tool. See details below.
Method 1.Partition external hard drive with built-in Disk Management
If you do not want to download any other partition tools, you can use Windows’ own partition tool to partition the external hard drive. The current built-in tools can solve basic partition operation such as creating, deleting, formatting and resizing partitions. First of all, connect the external hard drive to your computer, let’s take a look at how to partition external hard drive with Windows built-in disk management:
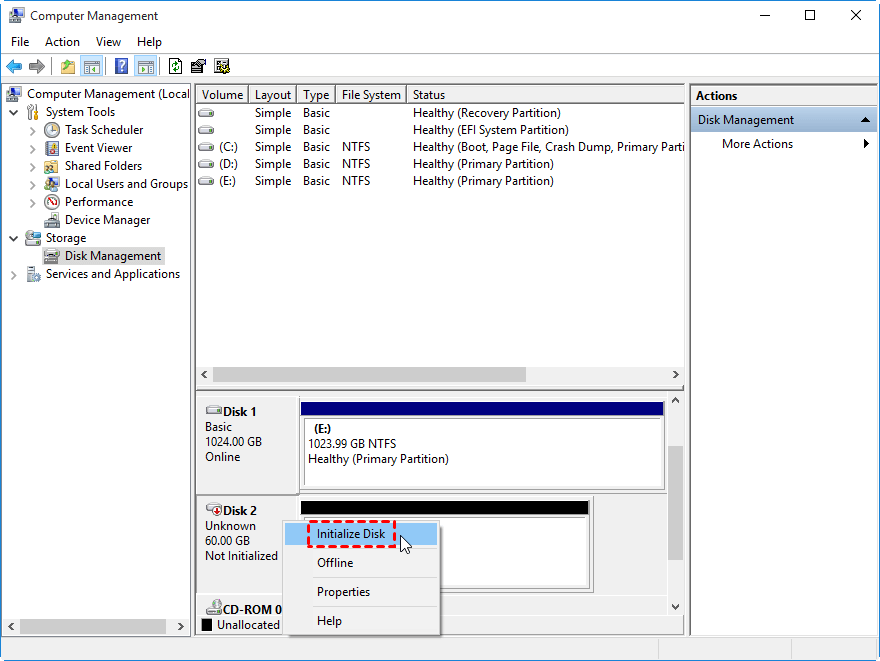
If you buy a new unpartitioned external hard drive, you need to initialize it first:
1. Right-click “This PC” on your desktop, choose “Manage” on the pop-up window.
2. Select “Disk Management”, there will a pop-up window for you to initialize disk, select disk and and choose a partition style you want, then click “OK”.
Thus, you can use Windows Disk Management to partition the external hard drive. Here take an example of creating partition.
3. Right-click your external hard drive, select “New Simple Volume”
4. Follow the wizard, finish the size, file system, drive letter step by step. After that, click “Finish”.
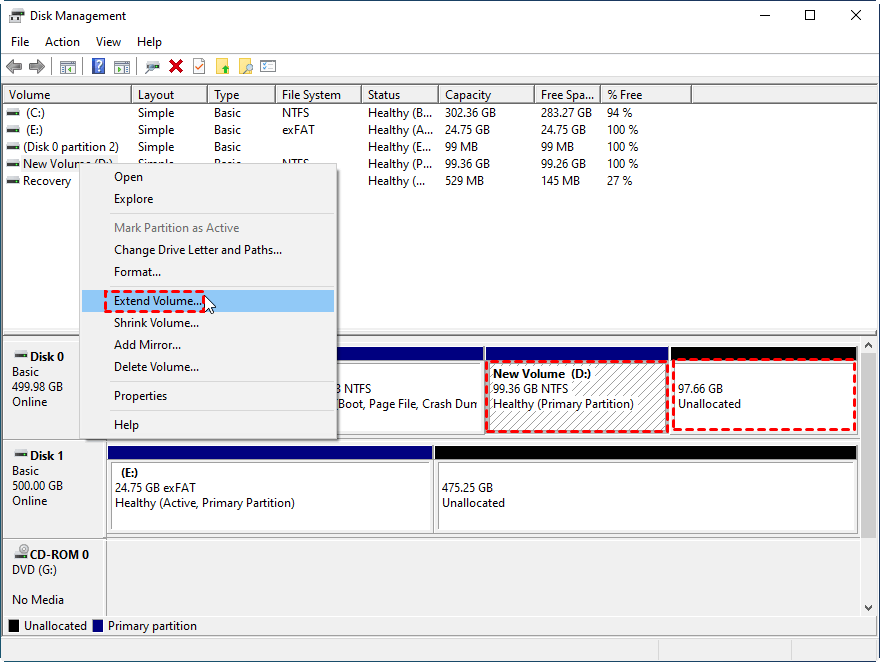
If you think the partition on the external hard drive is unreasonable and just want to repartition the external hard drive, you can use Windows Disk Management to extend partition or shrink partition, delete or create partition. Back up the data on it at first to avoid data loss. Then, follow the steps below:
1. Right-click “This PC” on your desktop, then choose “Manage”. If you need to extend partition, you can right-click the partition and select extend volume.
2. If you need to shrink volume, right click the partition and select shrink volume.
However, you may meet the problem that Extend volume greyed out or Shrink volume greyed out when you use Windows Disk Management to extend or shrink volume. Why that happens? That’s because the Disk Management can only extend or shrink NTFS partition. Besides, you can only extend an NTFS partition when it is followed by an adjacent unallocated space.
Method 2.Partition external hard drive with AOMEI Partition Assistant
If you try to partition an external hard drive in Disk Management but fail due to its limitations, don’t worry since you can do that easily with a free partition manager: AOMEI Partition Assistant Standard. It can create/move/shrink/extend/format/delete/merge/copy partition. It breaks out the limitations of Disk Management, being able to extend or shrink both NTFS and FAT32 partitions. Besides, its “Merge Partitions” can extend a partition with non-contiguous unallocated space.
Here, we will show you how to create a partition and extend a partition without losing data via the “Merge Partitions” function step by step. Download the freeware, connect the external hard drive to your computer and check out the tutorials.
Create a new partition on an existing partition or unallocated space
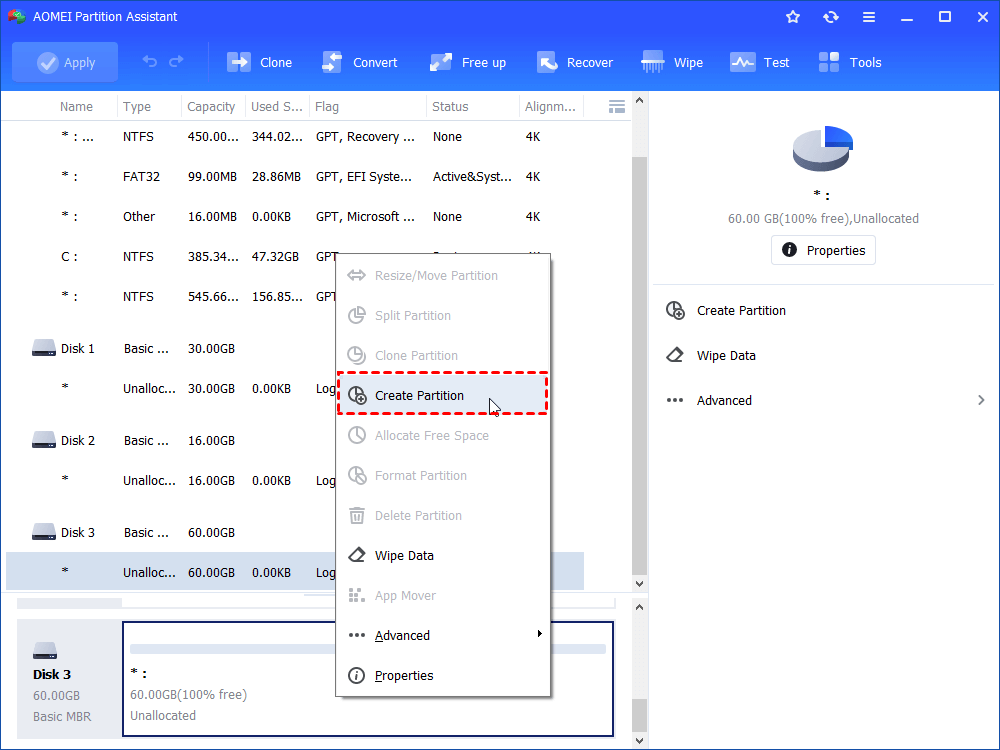
Step 1. Install and run AOMEI Partition Assistant. Your partition information will be displayed on the main interface. Right-click an existing partition or unallocated space on the external hard drive, select “Create Partition”.
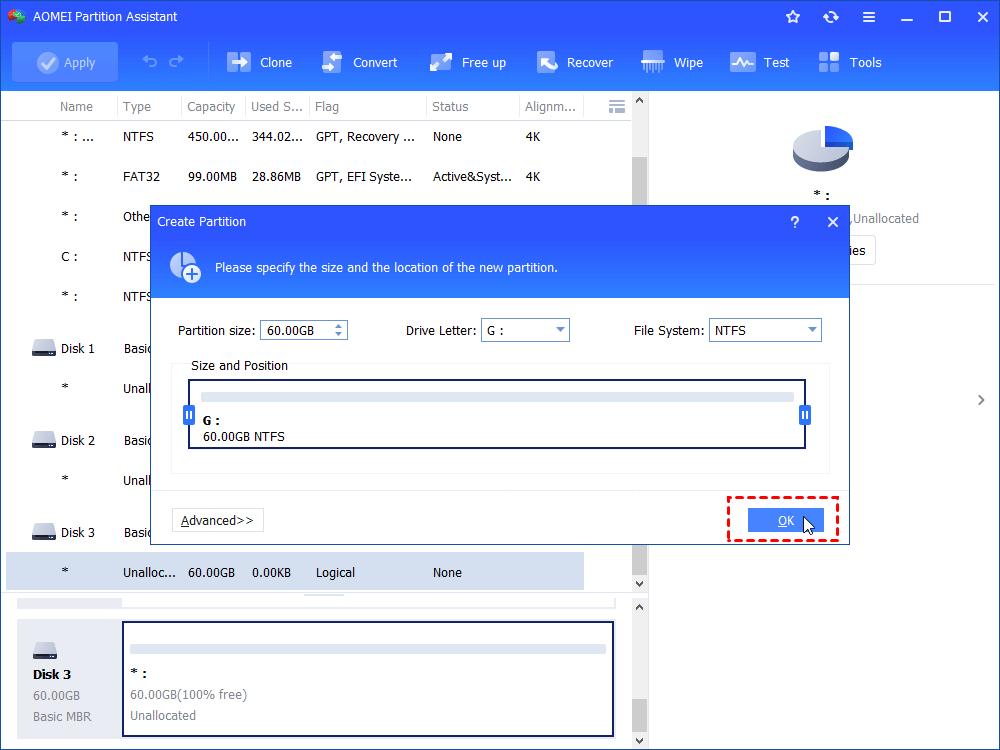
Step 2. In the pop-up window, there is a slider bar in the middle of the selected partition. You can drag it right or left to adjust the sizes of the partition. You can also directly modify the size of the new partition. And you can click “Advanced” to get more options. Click “OK” to continue.
Step 3. Then it will back to the main console, and you can preview the partition. Click “Apply” on the toolbar to commit the operation.
Extend a partition with non-adjacent unallocated space
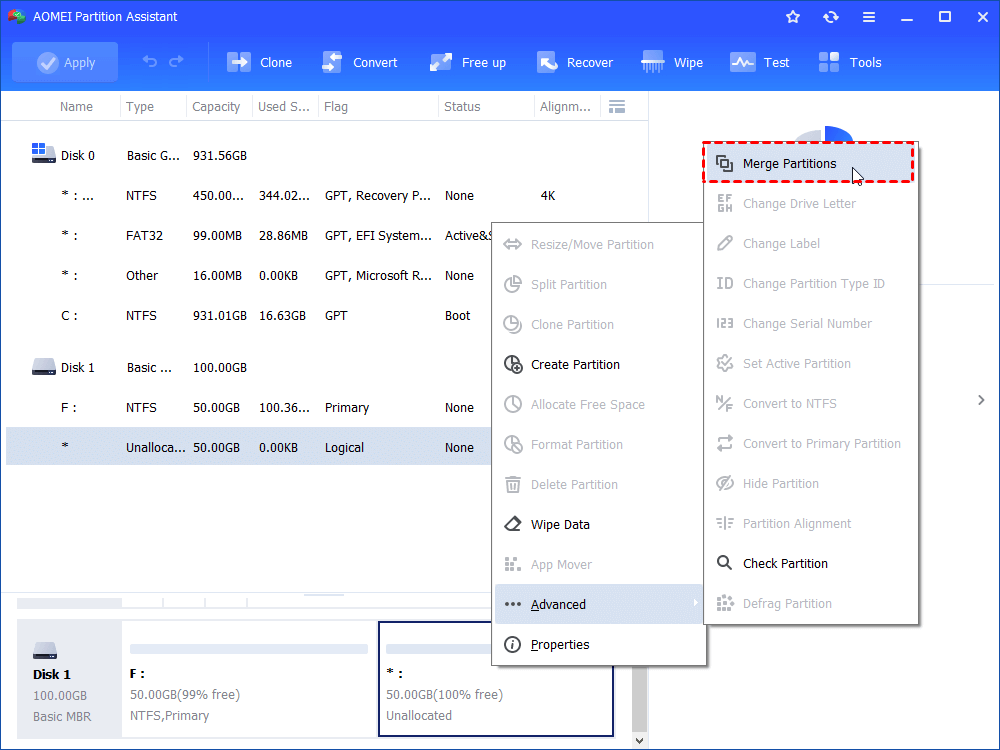
Step 1. Right-click the partition you want to extend, or the unallocated space and choose "Advanced"> “Merge Partitions”.
Step 2. Tick the unallocated space or the existing partitions and click on “OK”.
Step 3. Click on “Apply” to commit the pending operation.
Conclusion
Follow these simple steps, you can easily and effectively partition your external hard drive without losing data. AOMEI Partition Assistant can be the best free disk partition tool. Besides the above functions, it also has many other magic features, such as Migrate OS to SSD/HDD, Wipe Partition, Convert NTFS and FAT32 without formatting, Windows To Go creator and so on.
If you want to split a large partition into 2 smaller partitions, quickly partition a hard drive within one click, migrate OS from MBR disk to GPT SSD or HDD, convert MBR and GPT without deleting partitions or losing data, you can upgrade it to AOMEI Partition Assistant Pro.

