Solved - Clonezilla Destination Disk Is Too Small
When you use Clonezilla to clone a larger drive to a smaller drive, you may receive the Clonezilla destination disk is too small error. Please refer here to know what causes this and how to fix it.
By Dervish / Updated on May 12, 2023
Help! Clonezilla destination disk is too small
I'm trying to transfer the OS and data from the failed drive to the new one because I really want to avoid reinstalling Win Vista 32bit and all the programs. My source disk is a SATA 320 GB WD drive. And the target disk is Crucial MX500 250 GB. But Clonezilla tells me that the destination disk is too small. I don't know how to fix it, please help me.
- Question from superuser.com
Clonezilla is a free and open source disk imaging and cloning program. It provides system backup, disk cloning, system development and other functions. And, it works on different devices including Linux, macOS, Chrome OS, and Windows.
Why received Clonezilla error destination disk is too small?
However, some users may receive destination disk is too small warning when using Clonzilla to clone a hard drive. This makes people wonder if can Clonezilla clone to a smaller drive.
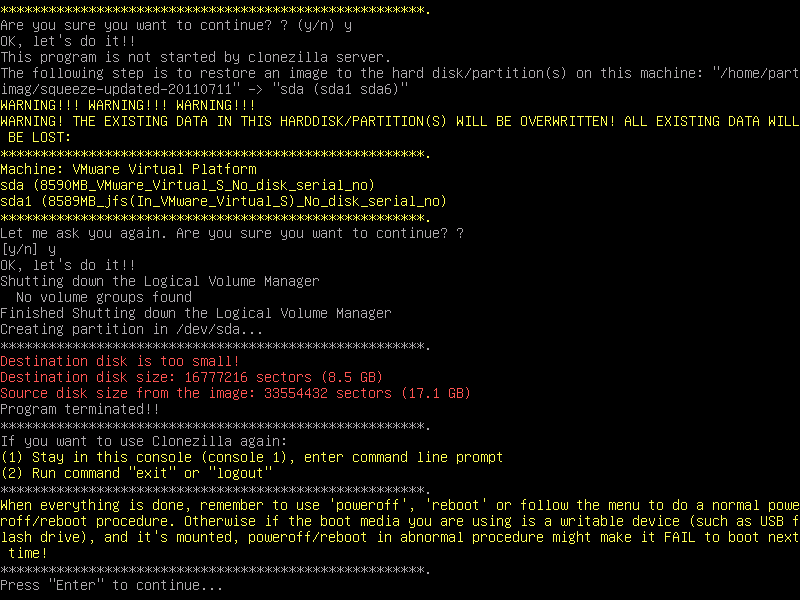
In fact, Clonezilla can clone a larger disk to a smaller one. But the partition size of the source disk needs to be smaller than the total capacity of the target disk. That is, if your source disk partition is 320GB, but only 150GB is used, and the total capacity of the target disk is 250GB, then you need to shrink the 320GB partition to less than 250GB.
Then, clone using the -icds mode provided by Clonezilla. This advanced mode allows Clonezilla to ignore disk size when cloning, which means that Clonezilla will not check the size of the target disk before creating the partition table. Next, I'll show you how to use Clonezilla to clone to smaller drive.
Step by step: Fix Clonezilla destination disk is too small
First, shrink the partition of the source disk as required below.
● Prepare a USB drive and make sure it can run multi-boot Clonezilla and GParted.
● Download GParted ISO, and create a GParted bootable USB.
● Boot GParted from the USB.
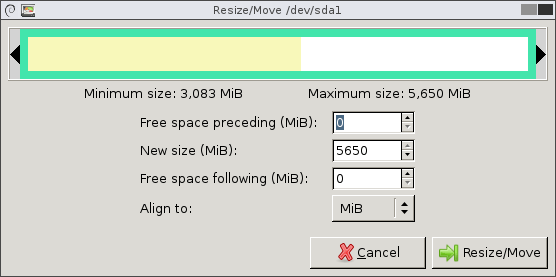
● Select the source disk partition and choose Resize.
● Here, please shrink the partition of the source disk to be smaller than the target disk. (If the destination disk is 250GB, the source disk partition needs to be smaller than 250GB, such as 200GB.)
After shrinking, make the source disk reboot and let Windows complete the CHKDSK, which must be done to continue.
Now, you can start using Clonezilla to clone to smaller drive.
● Download the Clonezilla ISO, create a Clonezilla bootable USB and boot it.
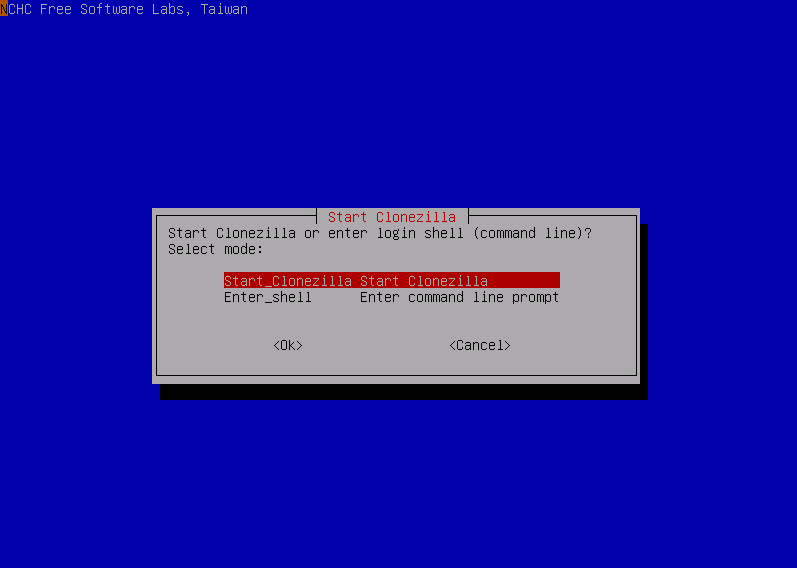
● Choose a language and keyboard layout, then choose "Start Clonezilla".
● Select local disk to local disk and choose Expert mode.
● Tick the -icds option and click "OK".
Wait for the end to complete the cloning.
This is the whole process of fixing Clonezilla destination disk is too small. But some users still don't work after doing this, so I suggest you try other software to clone a larger disk to a smaller one.
Alternative way to Clonezilla when cloning to a smaller drive
I strongly recommend you to use AOMEI Partition Assistant Standard (Available for Windows 11, 10, 8, 7, Vista, and XP). This is a professional disk migration tool, widely used to clone disks without damaging data.
It provides Clone Disk Quickly, which means you can clone a larger drive to a smaller drive. And the cloning steps are much easier than Clonezilla. Even if you are a user without a computer background, you can easily do it.
Tip: For cloning data disk, Standard Edition is enough. To clone system disk to a smaller disk, please turn to Pro Edition. If you are a Windows Server user, try Server Edition.
▶ Part 1. Preparation job
Before staring, we need to do some work to make sure the cloning will go successfully.
✎ Install the second hard drive. If there is one disk slot, you need to connect it with a USB adaptor.
✎ Initialize the disk if it is new.
✎ To avoid changing the boot mode, set the partition style(MBR or GPT) to be the same as the source disk.
▶ Part 2. How to clone the larger drive to a smaller one
Please refer to the following steps to learn how to clone disk with AOMEI Partition Assistant.
Step 1. Click “Clone Disk” in the right menu.

Step 2. Here, select “Clone Disk Quickly”.

Step 3. In the next window, we should choose the old disk as the source disk. Then, select the new disk as the destination disk. Don’t forget tick the“Optimize the performance of SSD”if is an SSD.

Step 4. In the pop out windows, you can resize the partition on this disk.

Step 5. At the end, you will be taken to the main interface where you will see that all partitions have been cloned to the destination disk. To generate the operations, you need to click “Apply”.

If you are cloning the system disk to a smaller disk, you need to know how to change the boot drive.
Conclusion
This is the full guide on how to fix Clonezilla destination disk is too small. In addition, we also introduced an alternative to Clonezilla that can help you clone disks of different sizes in an easier way. What's more, it has more advanced features are waiting for you to unlock, such as moving installed programs, allocating free space from one drive to another, converting MBR to GPT without data loss, etc.