Solved: Clonezilla Unable to Find Target Partition
If you're using Clonezilla for cloning but come across the "Clonezilla unable to find target partition" error, don't worry. This tutorial offers detailed steps to tackle this issue and clone your data successfully.
By Phoebe / Updated on December 8, 2023
Why is Clonezilla unable to find target partition?
"Hello, when I was trying to clone an image from a slightly larger SSD to a smaller one (both 120 GB, but from different manufacturers), I however kept getting an Unable to find target partition "sda1" error. I have tried it with multiple versions of Clonezilla including the latest testing build, but I still have the same problem. Thanks in advance for any assistance you can provide!"
- Question from Source Forge
Clonezilla is a powerful, free, and open-source disk imaging and cloning solution designed for system backup, disk cloning, and system development. Its versatility extends to various platforms, making it compatible with Windows systems, Linux, macOS, and Chrome OS.
However, Some users may receive Clonezilla unable to find target partition error when using Clonezilla clone larger disk to smaller disk. That is because Clonezilla will check both hard drives' sizes before starting to clone. It does not support cloning disk to a smaller one.
To fix Clonezilla failed to find this partition in this system caused by a smaller target disk, this article provides solutions to help you cloning larger drive to smaller drive. Please continue to read.
Stepwise guide: fix Clonezilla unable to find target partition
To resolve unable to find target partition Clonezilla, there are two major steps: 1) shrinking the source partition size with GParted; 2) utilizing the -icds mode in Clonezilla. The -icds is an advanced mode that allows Clonezilla to ignore disk size during cloning so that Clonezilla will bypass the check the size of the target disk before creating the partition table. The problem of the Clonezilla destination disk is too small may be solved by the way.
Detailed instructions are listed below:
Part 1. Shrink the source disk
Step 1. Prepare a USB drive capable of running multi-boot Clonezilla and GParted.
Step 2. Download the GParted ISO and use GParted to create a bootable USB.
Step 3. Boot into GParted via USB drive.
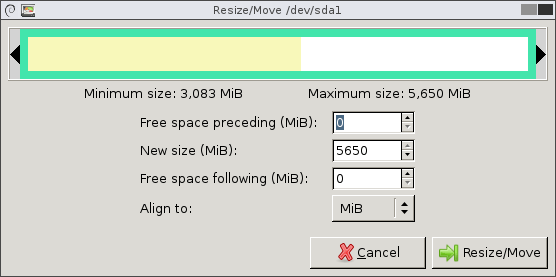
Step 4. Select the source disk partition and select "Resize/Move".
Step 5. Make sure that the source disk partition is smaller than the size of the target disk.
After shrinking, reboot the source disk and allow Windows to complete the CHKDSK to ensure continuity.
Part 2. Use Clonezilla to clone to smaller drive
Step 1. Download the Clonezilla ISO and create a bootable USB for Clonezilla.
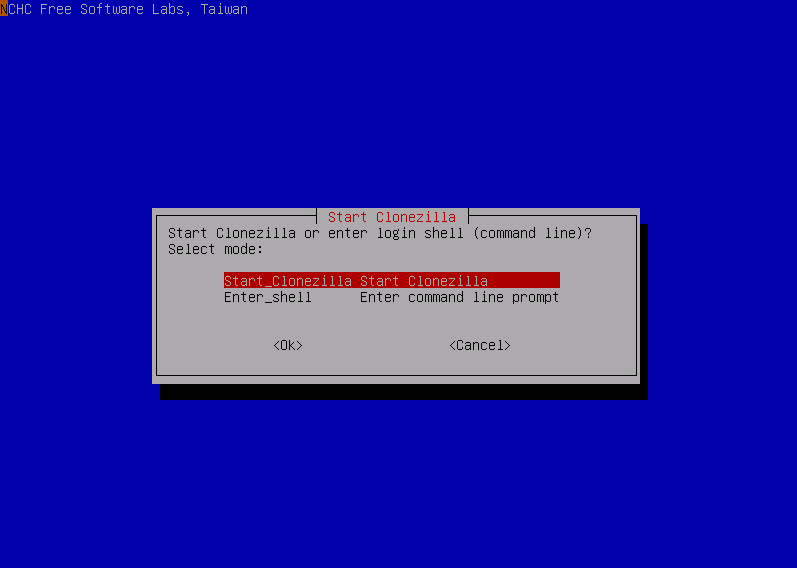
Step 2. Boot from USB and select a language, keyboard layout, and then select "Start Clonezilla".
Step 3. Select "Local Disk to Local Disk" and "Expert Mode".
Step 4. Enable the "-icds" option and confirm with "OK". Wait for the cloning process to complete.
This method usually fixes the Clonezilla unable to find target partition issue.
An easier alternative to clone to a smaller drive
However, users may find the solution above difficult to operate, or the -icds mode in Clonezilla still cannot work. Don't worry. There is an easier yet free alternative - AOMEI Partition Assistant Standard (Supports Windows 11, 10, 8, 7, Vista, and XP). This free disk cloning software helps you clone larger disks to smaller ones with ease.
Key disk cloning highlights:
☞ Clone disk quickly: Only clone the used sectors, making cloning a larger drive to a smaller drive possible.
☞ Sector by sector clone: Clone every bit of information on the target drive, getting an exact duplicate of the original disk.
☞ Secure boot: Ensure successful booting from the cloned drive after the process.
☞ Easy to operate: Provide step-by-step guides on the entire cloning process, suitable for users at all Windows skills, especially for beginners.
☞ Cancel at will: Able to cancel all pending operations before clicking "Apply", guaranteeing the preservation of your data.
Part 1. Preparation
Before we begin, we need to do some work to ensure that cloning is successful.
- Install the second hard drive. If there is 1 disk slot, a USB adapter needs to be connected.
- If this is a new disk, initialize the disk.
- To avoid changing the boot mode, set the partition style to the same as the source disk. (This article focuses on cloning disks from MBR to MBR.)
Part 2: Clone a larger drive to a smaller drive
Please refer to the following steps to learn how to clone a larger disk using AOMEI Partition Assistant.
Step 1. Launch AOMEI Partition Assistant Standard. Click "Clone Disk" in the right menu.

Step 2. Select a disk clone method. There we select "Clone Disk Quickly" to clone only used space to another disk.

Step 3. In the next window, we should select the old disk as the source disk. Then, select the new disk as the target disk. If it's an SSD, don't forget to check "Optimize the performance of SSD".

Step 4. In the pop-up window, you can resize the partition on that disk and click "Next".

Step 5. Finally, you will enter the main interface and you will see that all partitions have been cloned to the target disk. Then click "Apply" to save changes.

Once completed, your larger hard drive has been successfully cloned to the smaller one.
Bonus tip: How to boot from the cloned drive?
After the cloning process is complete, the target drive must be designated as the boot disk. If you're not sure about the details, follow these steps:
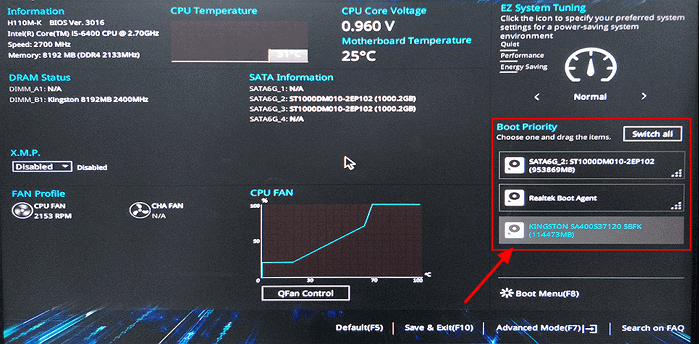
Step 1: Restart your computer and press the "F2/F8/Del" keys to access the BIOS setup.
Step 2: Use the arrow keys to navigate within the BIOS setup to find the "Boot" option. Look for "Boot Device Priority" or a similar setting.
Step 3: Use the "+" or "-" keys to adjust the boot device priority to ensure that the target drive gets the highest priority.
Step 4: Press "F10" to save changes, exit the BIOS interface and restart the system.
Following these steps will enable you to successfully boot your computer from the cloned drive.
Conclusion
Here is the complete guide on how to fix Clonezilla unable to find target partition. Additionally, we have launched an alternative to Clonezilla that can help you clone disks of different sizes in an easier way. What's more, it has more advanced features waiting for you to unlock, such as moving installed programs, allocating free space from one drive to another, and converting MBR to GPT without losing data.

