[Step-by-Step Guide] Install SSD without Reinstalling Windows System
In this guide, you can learn how to install SSD without reinstalling Windows to quickly and conveniently add SSD on your computer.
By Lucas / Updated on May 12, 2023
Can I install SSD without reinstalling Windows?
With the growing popularity of SSDs, an increasing number of computer users want to use SSD as the system disk and use HDD as the data disk when building a new PC or replacing HDD boot drives with SSDs on existing PC for improved performance. Some users choose to install Windows on SSD using installation media for a clean installation.
However, a clean installation will remove all user profiles, system settings, and personal information. Furthermore, you must reinstall all existing programs and recreate the data files on the original drive.
Thus, some users choose to clone the original system to their new SSDs to avoid reinstalling all programs and system.
Clone is to create a complete duplicate of your original disk on the target disk with professional disk cloning software. After the clone, the target disk can immediately run on a PC when all sets are done.
Preparation of installing SSD on a PC
Although the process of the clone is not difficult, we need to do some preparations to make sure the target disk can boot and run your system smoothly. In this part, we’ll mention some notes to make sure your SSD is ready for cloning.
▶ Connect an SSD to the target computer
First, you need to connect your SSD to your computer.
Step 1. After powering down your PC, open the case, and find the SSD power input interface which is flat type.
Step 2. Find the SSD data input/output interface, i.e. SATA cable. It‘s also flat type, and narrower than the power cord, and connects these two to the corresponding interface.
Step 3. Put SSD inside the chassis and close it.
Step 4. Turn on your PC, and check if the system recognizes it or not.
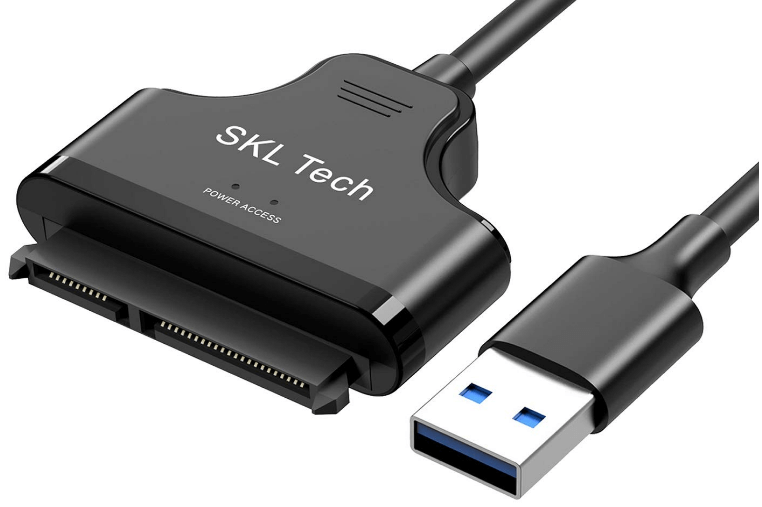
Note: If you’re using an old laptop, your computer may have one slot, so you need a USB-to-SATA cable or SSD enclosure to connect the SSD as an external drive.
★ Install a new SSD
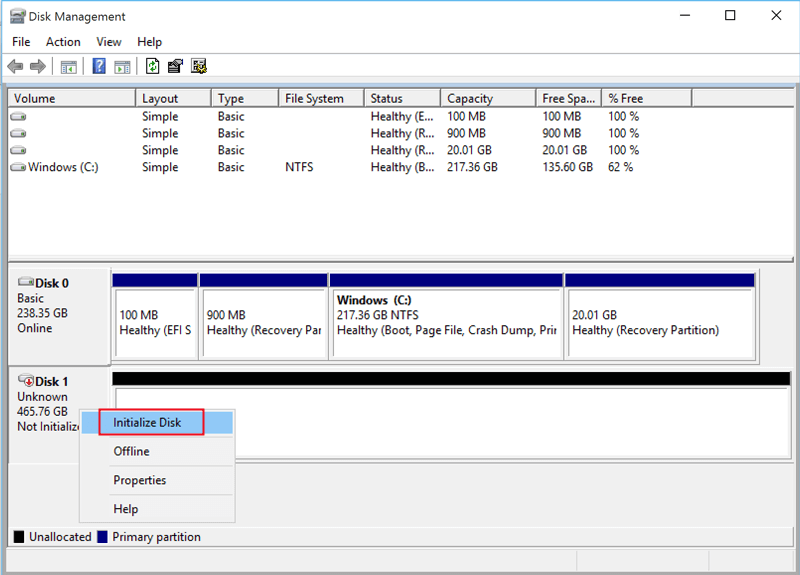
For users who install a totally new SSD, after your system detected the disk, you need to open Disk Management to initialize it before cloning.
Step 1. Right-click “My Computer/This PC”, and select “Manage” to open the window, then click on “Storage” > “Disk Management”.
Step 2. Right-click the new SSD and choose “Initialize Disk”.
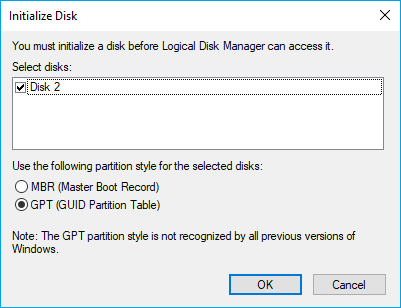
Step 3. In the next window, choose a proper partition style for your SSD and click on “OK”.
Note: If your original system is Windows 11, please initialize the new SSD into the GPT partition scheme because Windows 11 requires UEFI boot mode which only matches the GPT partition style.
★ Install/use an old SSD
Some users may wish to use an old SSD as a system disk, if the SSD's partition type is incompatible with your existing boot mode, we suggest you convert MBR to GPT or vice versa ahead of time. Otherwise, you need to switch the boot mode after cloning.
You can check the partition style:
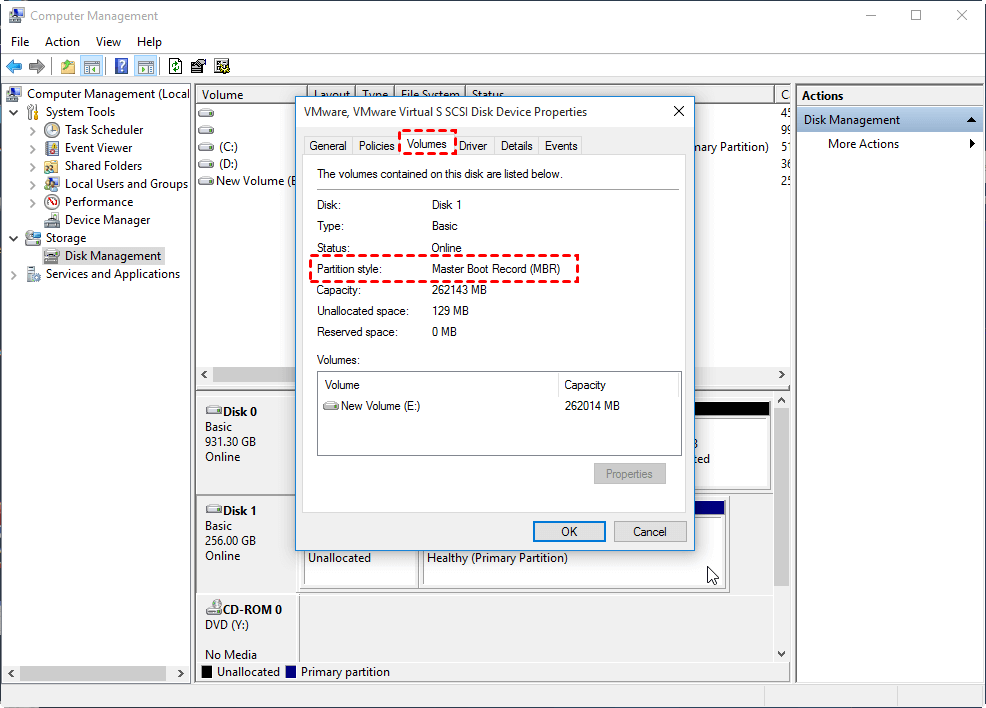
Step 1. Press Win + R to open the Run window -> type "diskmgmt.msc" and hit OK to open disk management.
Step 2. Right-click the disk you want to check and click "Properties" -> then, select the "Volume" tab to check the "Partition style".
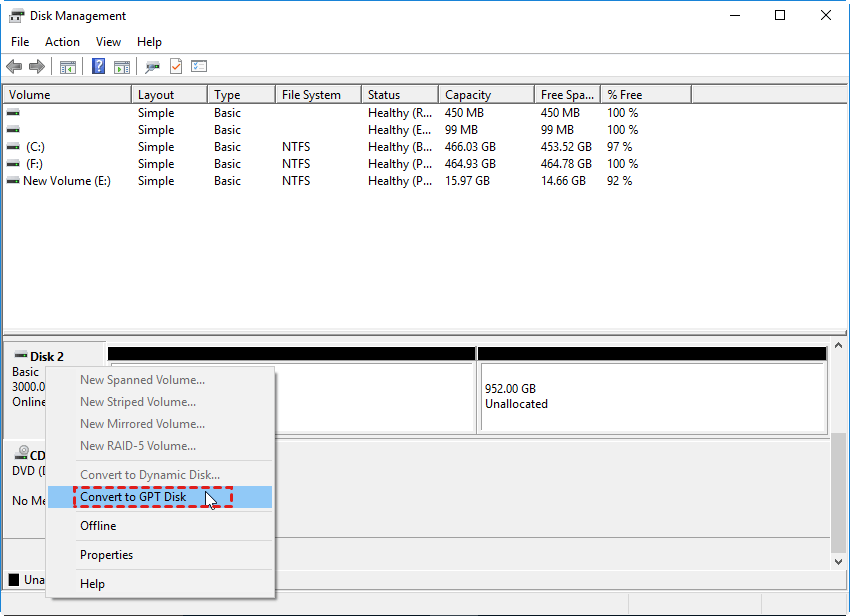
(Optional)Step 3. You can convert SSD to a suitable partition style in Disk Management or CMD, here, we’ll show using Disk Management to convert disk.
Step 1. In Disk Management, delete all partitions on the SSD, and right-click the disk to choose “Convert to GPT” or “Convert to MBR”.
Clone Windows to SSD without reinstalling
When your SSD is ready to carry your system and programs, you need to choose a reliable disk cloning software. Here we recommend you AOMEI Partition Assistant Professional, a disk and partition manager for Windows 11/10/8/8.1/7/XP.
This tool has 2 ways to help you install SSD on PC without reinstalling Windows:
◤ Option 1. Disk Clone Wizard
The “Disk Clone Wizard” function can clone all files on the disk to another. The cloned disk is exactly same as the original disk.
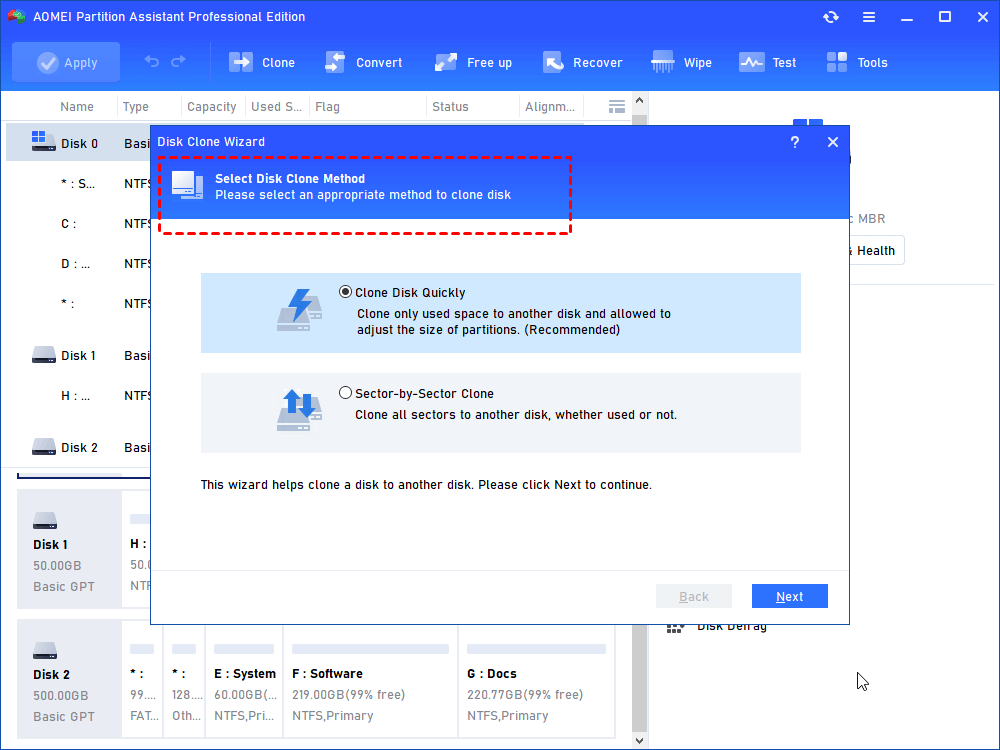
• “Clone Disk Quickly” only copies the used sectors to the destination location, allowing the target disk smaller than the total size of the source disk.
• “Sector-by-Sector Clone” will copy all sectors to the target disk, so the destination disk must be equal to or larger than the source disk.
◤ Option 2. Migrate OS to SSD
For users who want to keep only a customized Windows system, you can choose “Migrate OS to SSD”. This function only transfers system and system-related files to make sure the system can smoothly boot from the new disk.
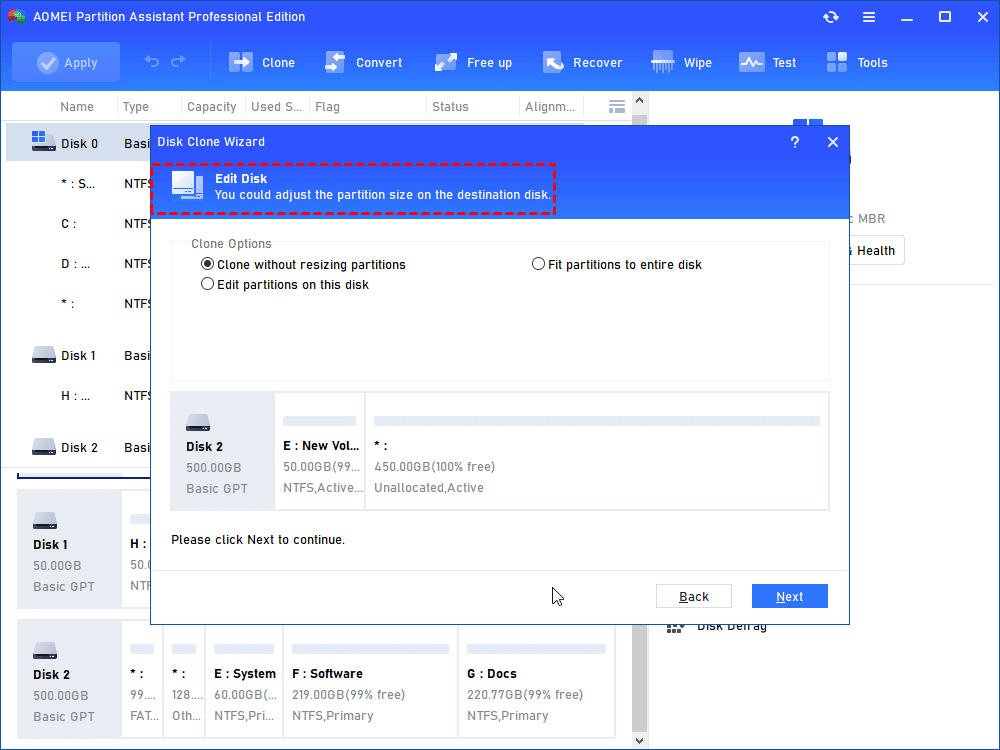
Both options allow users to align SSD partitions to optimize SSD performance and resize partition size during the cloning process.
Here are two ways how to install SSD in PC without reinstalling Windows.
Way 1. Clone system disk to an SSD
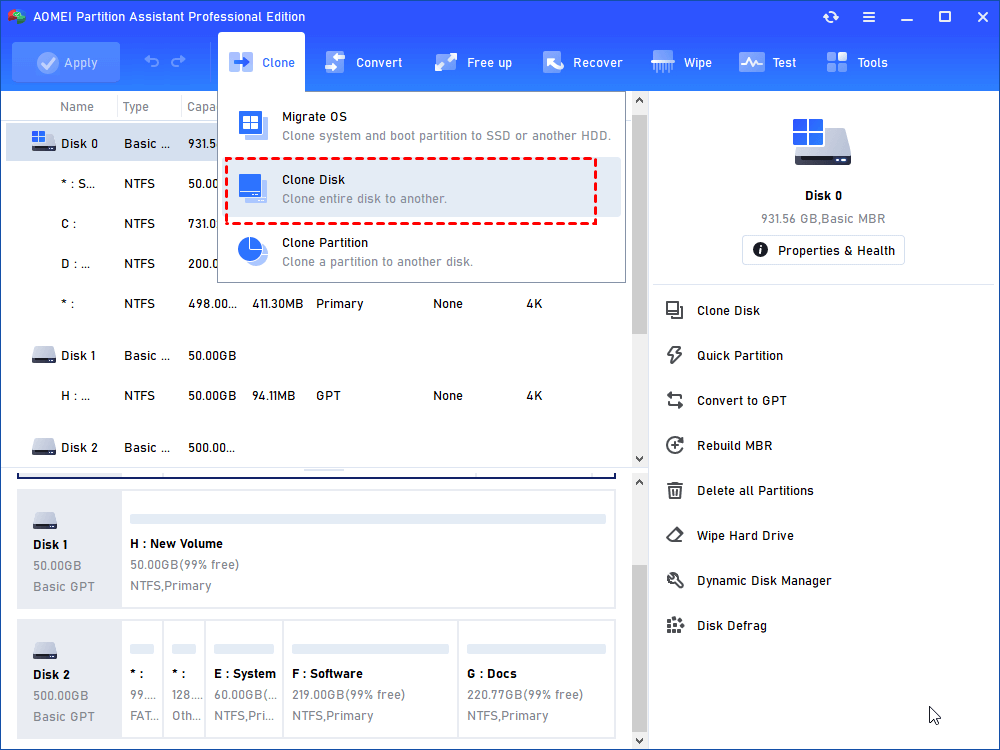
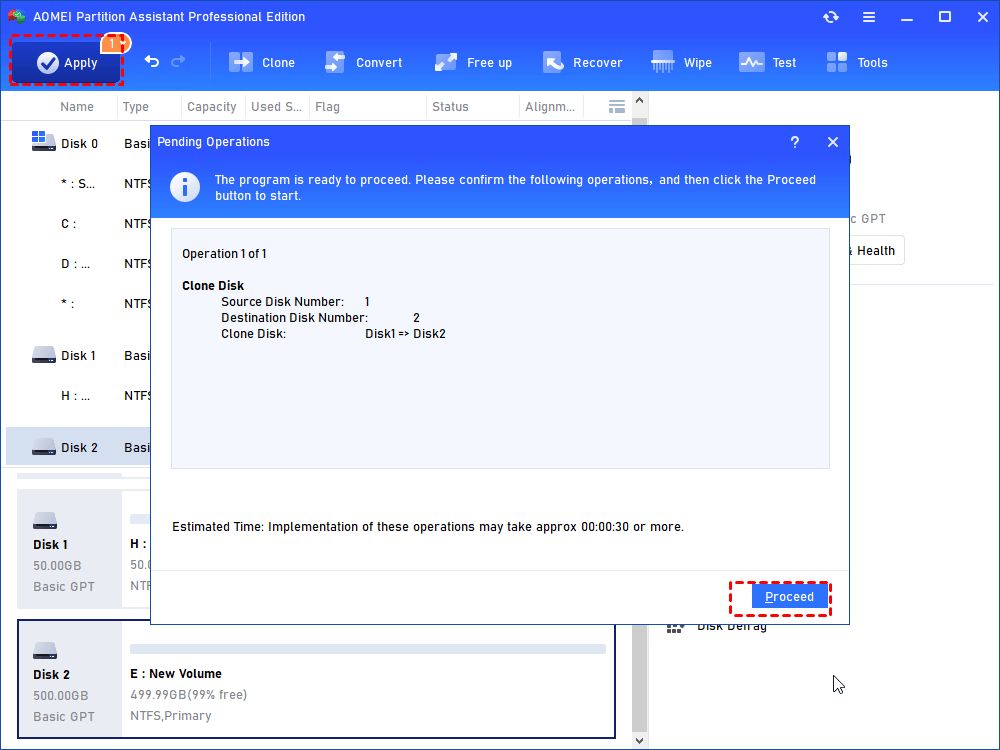
Step 1. In the main interface of AOMEI Partition Assistant Professional, click “Clone Disk” in the right menu.
Step 2. Select a copying method you need from "Clone Disk Quickly" and "Sector-by-Sector Clone". Here we select “Clone Disk Quickly” as an example.
Step 3. Select the Windows system disk as the source disk and hit on “Next”.

Step 4. Then select the SSD drive as the destination disk and click “Next”.

Step 5. Now, you can also resize partitions just being created on the SSD drive.
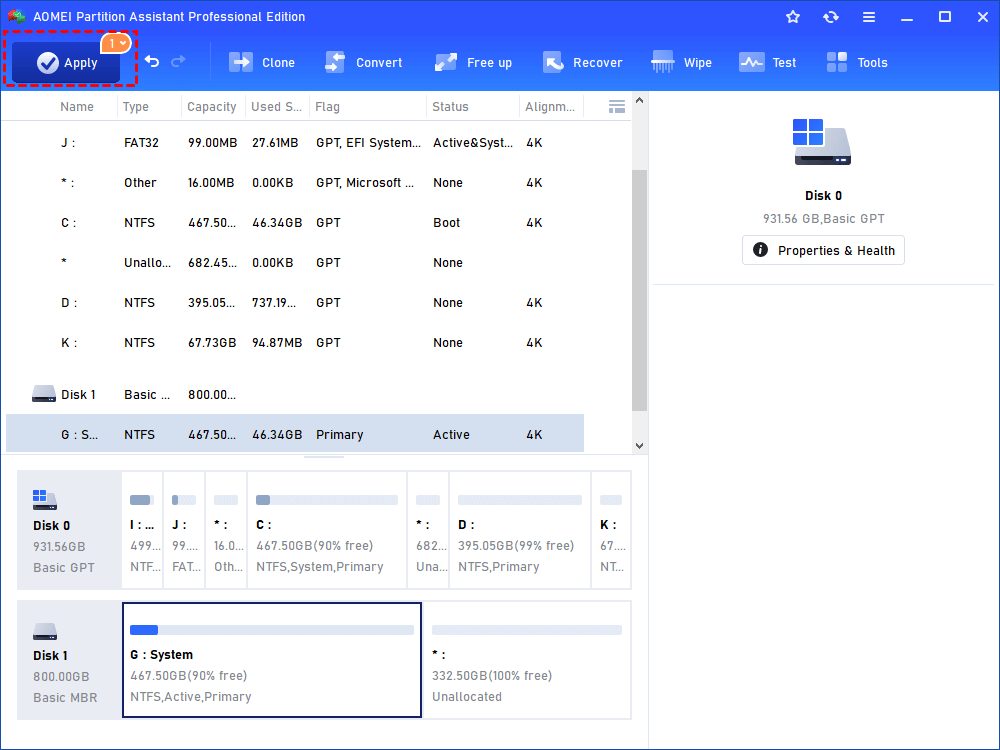
Step 6. Read the subsequent boot note, click “Finish” and then click “Apply” to execute the pending operation.
Way 2. Clone only Windows system to an SSD
Step 1. Open AOMEI Partition Assistant Professional. Click “Clone” on in the top toolbar, and choose “Migrate OS”.

Step 2. Choose an unallocated space on the SSD drive. If there are partitions on it, tick "I want to delete all partitions..." to generate unallocated space and click “Next”.

Step 3. In this window, you can resize the partition as you need, then click “Next”.

Step 4. A note on how to boot from the destination disk will appear, read it carefully and click “Finish”.
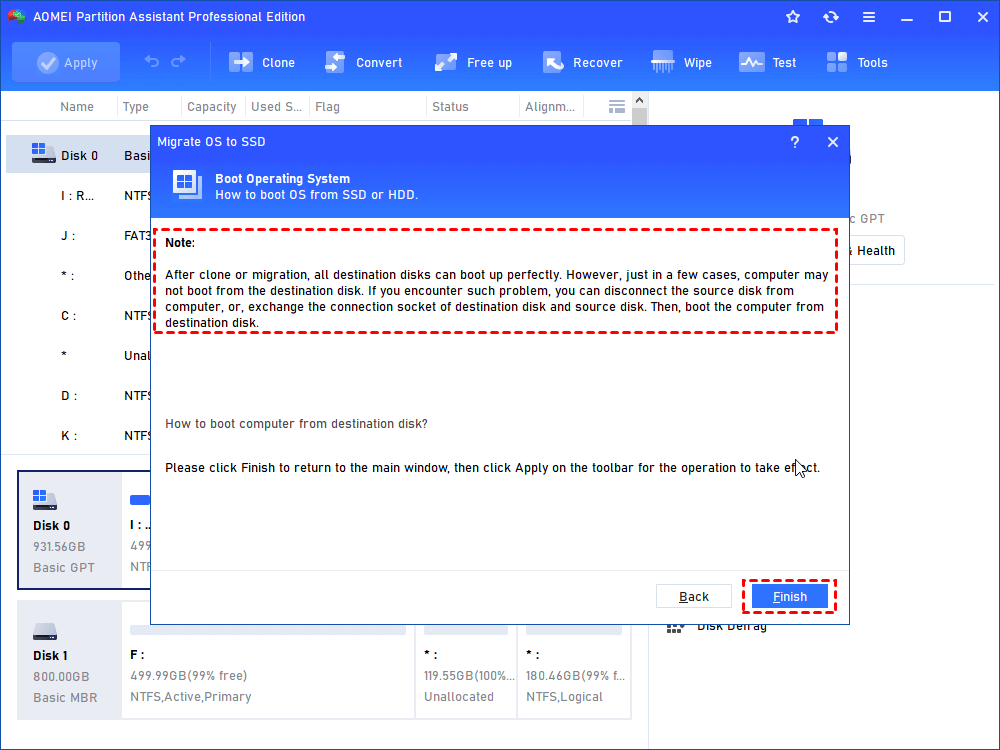
Step 5. Click “Apply” to commit the Windows system clone to SSD operation.
Boot from the destination SSD
After you install Windows on SSD via cloning, to boot from the SSD, you’ll need to change the boot order in BIOS.
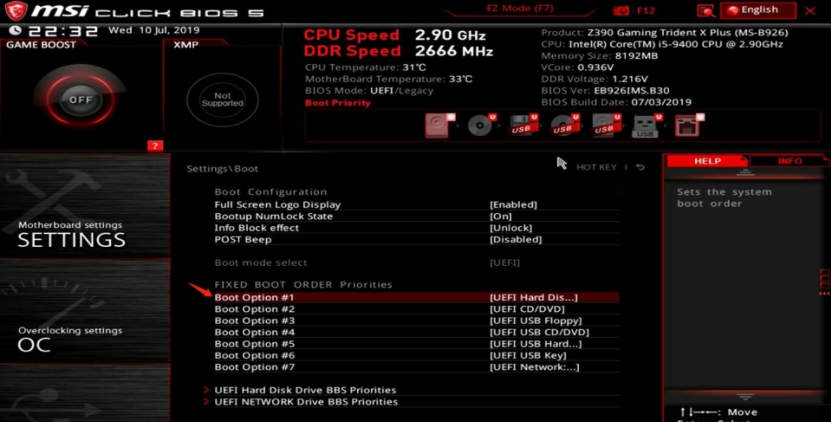
Step 1. Restart the computer and constantly press the F2 key (or other keys like Del, F8, and F12) to access the BIOS menu.
Step 2. Use the arrow key to select the Boot tab. System devices will appear in order of priority.
Step 3. To give the cloned SSD a boot priority over other hard drives, move it to the first position in the list.
To sum up
To install SSD without reinstalling Windows, cloning your system or the system disk is the most convenient way for users who want to quickly upgrade the HDD to SSD. AOMEI Partition Assistant is a disk expert to help you solve this problem.
Besides clone disk and OS migration, this tool can also convert file systems without formatting drives, extending partition, moving folders and installed programs without reinstalling, and so on. And if you’re using a Windows Server 2022/2019/2016/2012(R2)/2008(R2)/2003 system, the Server Edition of this tool can help you conveniently manage your PC.