How to Safely & Easily Perform Sony PS4 HDD Upgrade
Many users wish to undertake a Sony PS4 HDD upgrade after the release of the PS5, but how? If you wish to update the hard disk on your PS4, you can do it yourself by following this article.
Why choose to upgrade PS4 HDD?
Sony's PlayStation 5 boasts a high-end built-in SSD, but if you can't afford a $500 console just yet, you might still be dealing with frustratingly slow loading times on your trusty PS4. However, there's a silver lining. You can give your current console a new lease on life by upgrading its storage to an SSD.
The standard 5400 RPM hard drive that ships with the PS4 and PS4 Pro can feel painfully sluggish, even at this stage in the PS4's lifespan. Adding an SSD can be a significant improvement. While it won't magically make loading times instant, it can shave off 10 to 20 seconds or more from your wait times. Remember that the extent of improvement can vary from game to game, but when you're eagerly waiting to dive into your gaming adventures, every second counts.
When selecting an SSD for this upgrade, you don't necessarily have to go for the absolute fastest one available. However, you should ensure it's a 2.5-inch model, as opposed to the M.2 SSDs commonly used in PCs these days.
Swapping out the drive itself is surprisingly straightforward; all you'll need is a screwdriver and a suitable hard disk.
How to choose a new hard disk for PS4 HDD upgrade
Before we actually start to upgrade your disk, first, you need to select a suitable disk. As we’ve mentioned in the above content, we sincerely suggest you upgrade your old PS4 HDD to an SSD for better performance. But, some users may insist on HDD. So, in this part, we’ll introduce some disks for you.
▶ Suitable hard drive for PS4
If you're considering a PS4 hard drive upgrade and you're in search of the top-notch option available right now, your best bet is to opt for an SSHD. These drives seamlessly blend traditional platter-based storage with smaller, high-speed sections of flash memory. They also learn which files you access frequently and cleverly relocate them to the faster flash storage, resulting in quicker load times.
The generous 2TB capacity ensures you'll have ample additional storage space, even if the games you install don't directly benefit from the flash memory portion of the drive. Plus, it's worth noting that this SSHD option will never perform worse than the PS4's internal drives, making it a reliable choice:
Seagate FireCuda 2 TB Solid State Hybrid Drive Performance SSHD – 2.5 Inch SATA 6 Gb/s
Seagate ST2000DX002 FireCuda 2 TB internal hybrid hard drive
▶ Suitable SSD for PS4
For SSD, we recommend Samsung and Crucial disks.
When it comes to consumer SSDs, Samsung reigns supreme, making their solid-state products the top choice for upgrading your PS4. The 870 QVO, in particular, stands out by offering exceptional performance, surpassing the PS4's hard disks by several times. This upgrade results in noticeable enhancements to loading times and overall performance for both the PS4 and PS4 Slim. Moreover, even the PS4 Pro, which features a superior storage interface, experiences a boost in speed.
Samsung's SSDs are known for their remarkable speed and reliability. They come in a consistent 7mm form factor, offering flexibility in terms of capacity. Depending on your needs, you can opt for capacities ranging from 1TB to 8TB since SSDs don't face the same physical size constraints as hard disks.
Step-by-step to perform Sony PS4 HDD upgrade
After we learn some about how to choose a suitable disk, we can set about our task. The process of upgrading PS4 HDD includes backing up all your data first, then reinstalling the PS4 operating system onto the new drive, and finally, restoring your data—a process that may seem a bit confusing initially. You'll require one, maybe two, USB drives to achieve this.
Another shortcut is to clone your original PS4 HDD to a new SSD and then install it back on your machine. This would save time. So, in this post, we’ll show you 2 ways separately, you can choose one way that suits you.
But the first section is the same for 2 options, we need to take the original disk out from your console. The steps of how to uninstall an old disk will be shown briefly on the page because different versions of PS4 have different ways. You may need to check more details on the official web for your console.
Opt 1. Manually upgrade PS4 HDD via reinstalling
▍Part 1. Back-up game saves
The first crucial step is to safeguard all your existing data. Before you even think about reaching for that trusty screwdriver, ensure you have your data securely backed up. You'll require a USB drive for this purpose, unless, of course, you're already a PlayStation Plus subscriber, in which case you can conveniently back up your data to the cloud.
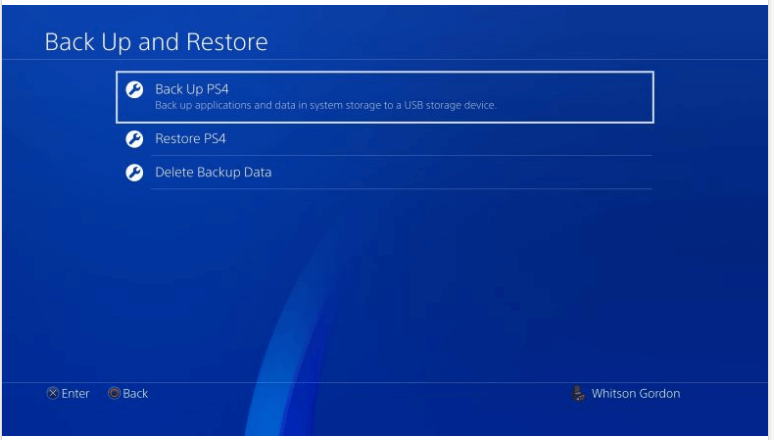
Step 1. Insert your USB drive and navigate to the following menu on your PS4: Settings > System > Back Up and Restore. Once there, opt for the "Back Up PS4" option. It's essential to back up your Saved Data, as this includes your invaluable game saves.
If you happen to have a PlayStation Plus subscription, there's an even more straightforward route. Head to Settings > Application Saved Data Management > Saved Data in System Storage and select "Upload to Online Storage."
It's important to note that your trophy data won't be included in this save data backup. If preserving your hard-earned trophies is a priority, navigate to the Trophies section in the PS4 menu. There, press the Options button on your controller and choose "Sync Trophies with PSN."
Once the backup process is complete, it's time to power down your PS4 entirely. Navigate to Power > Power Options > Turn Off PS4. Be sure not to leave it in Rest Mode. Wait until the indicator light stops blinking, indicating that it's completely powered off, and only then should you proceed by unplugging the power cable.
▍Part 2. Replace old HDD on PS4
Sony made upgrading the hard drive quite simple; nevertheless, the actual procedure varies depending on the version of the PS4 you own. The following are the instructions for each model:
For the different models of the PlayStation 4, the process of upgrading to a disk varies slightly. Here's how to do it for each:
For the Original PlayStation 4:
If you have the original PS4, start by sliding the glossy panel on the top of the unit to the left until it comes off completely.
Next, unscrew the screw closest to you on the left side.
Now, pull the hard drive cage toward you to access the hard drive.
Unscrew the four screws holding the drive in place and replace it with your new disk.
For the PlayStation 4 Slim:
If you own a PS4 Slim, turn the unit around to its back.
To the right of the ports, you'll find a black piece of plastic with text on it. Apply some pressure and slide it to the right to remove it.
Beneath it, you'll discover a large screw—remove it.
Slide out the drive cage from the side of the PS4 using the black ribbon.
Unscrew the four screws holding the drive in place and replace it with your new disk.
For the PlayStation 4 Pro:
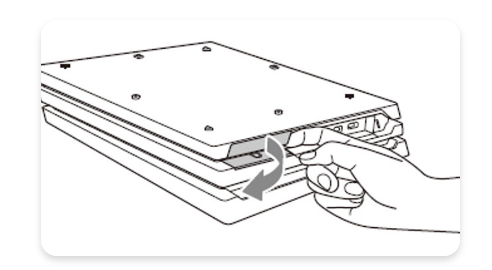
On the PS4 Pro, turn the unit around and locate the hard drive cover to the right of the ports.
Find the notch on the side and use your finger to swing it open—this might require a bit of force.
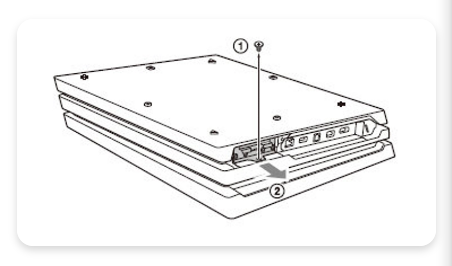
Remove the screw located underneath the cover.
Slide out the hard drive cage.
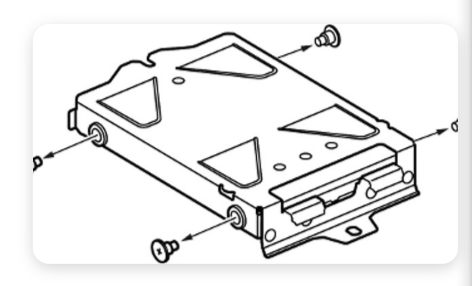
Unscrew the four screws holding the drive in place and replace it with your new disk.
Once you've successfully installed your HDD/SSD into the console, securely close it up, and plug it back in. However, before you power it on, you'll need to head to your computer for the next steps.
▍Part 3. Reinstall the PS4 software
To prepare your USB drive for the next steps, follow these instructions on your computer:
Step 1. Insert a USB drive (make sure it's not the same one you used for your PS4 backup). Right-click the drive in File Explorer and select "Format." Choose FAT32 as your file system for formatting.
Step 2. Create a folder on the USB drive and name it "PS4."
Step 3. Inside the "PS4" folder, create another folder called "UPDATE."
Now, proceed with the following steps:
Go to Sony's official website and visit the page that provides instructions for reinstalling the PS4 console system software. Scroll down to the section titled "How to reinstall the PS4 console system software" and locate the "PS4 console reinstallation file" button.
You can also open the "Reinstall PS4 system software" drop-down to access Sony's instructions. Download the file as instructed on the website and save it in the "UPDATE" folder you created earlier. Do not rename the file; it should be named "PS4UPDATE.PUP" for it to work correctly.
With the USB drive now prepared, eject it from your computer and return to your PS4 console:
Step 1. Plug in your controller to the PS4 using a USB cable.
Step 2. Press and hold the power button on the PS4 for about seven seconds, or until you hear the second beep. This action will bring your PS4 into Safe Mode.
Step 3. Select the "Initialize PS4 (Reinstall System Software)" option in Safe Mode and press the X button.
Step 4. Insert the USB drive with the update file and follow the on-screen instructions. Once your PS4 detects the update file, choose "Next" to begin installing the PS4 software on your new, high-speed drive.
After the installation, your PS4 will automatically reboot, and you'll find yourself at the initial setup screen.
▍Part 4. Restore data and reinstall games
Once you've completed the initial setup, you'll need to log into your PlayStation account again, just as if you were setting up a brand-new PS4 for the first time. However, before you continue, it's crucial to restore the data you previously backed up.
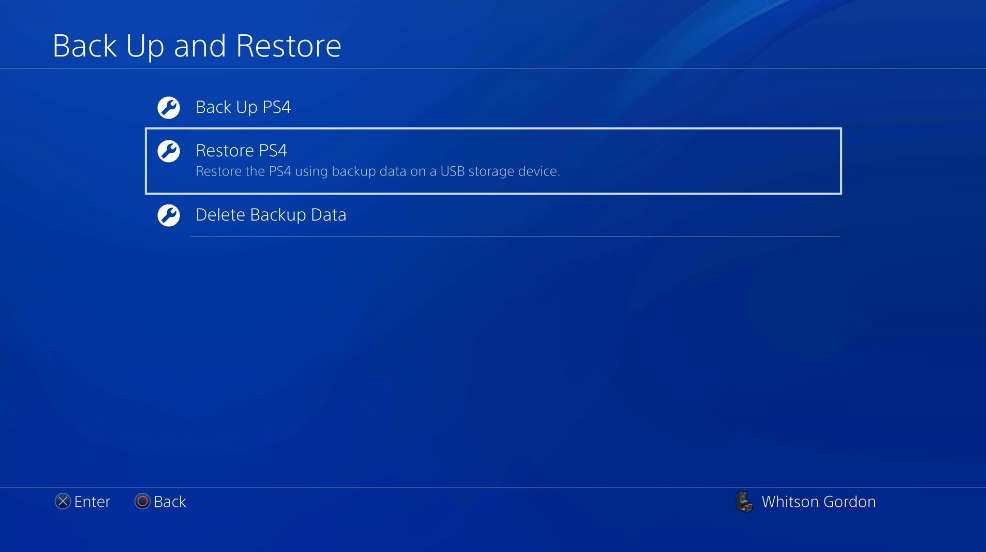
If you opted to manually back up your data on a USB drive, insert that USB drive into the console. Then, navigate to Settings > System > Back Up and Restore > Restore PS4 to initiate the restoration process.
Alternatively, if you backed up your data using PS Plus, follow these steps:
Step 1. Open Settings.
Step 2. Navigate to Application Saved Data Management.
Step 3. Select Saved Data in Online Storage.
Step 4. Choose the "Download to System Storage" option.
After restoring your saved data, you'll need to re-download and/or re-install your games. Once that's completed, you should be all set to jump back into gaming, now benefiting from shorter loading times, allowing you to dive into your gaming experience as swiftly as possible.
Opt 2. Clone PS4 hard drive to SSD to quickly upgrade disk
If you choose to upgrade your PS4 manually, you’ll have to reinstall the system and all games. And some of the data might not be restored. So, the best option is to quickly and safely upgrade PS4 HDD.
You can use professional disk cloning software such as AOMEI Partition Assistant Standard to finish the cloning job. It's a free yet powerful hard drive cloner that will assist you in transferring all data from the PS4 hard disk to the new SSD. And its outstanding features may meet all of your disk copying needs.
Step 1. Install and launch the AOMEI Partition Assistant Standard. Click “Clone Disk” in the right menu.
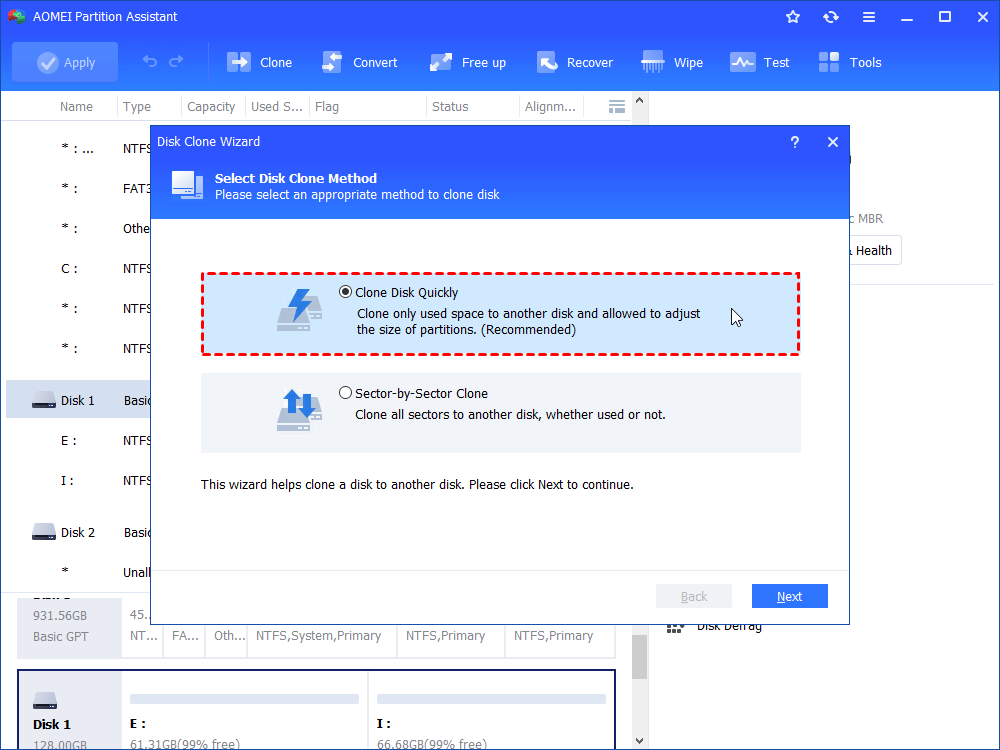
Step 2. Choose a clone method: "Clone Disk Quickly" or "Sector-by-Sector Clone" and click "Next".
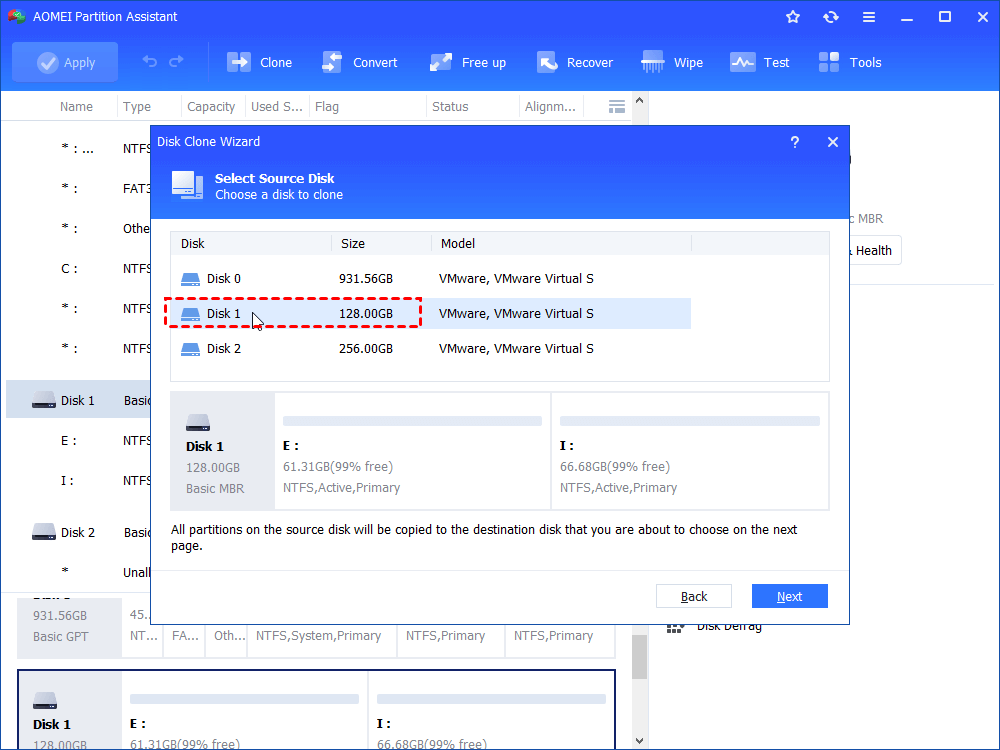
Step 3. Here select the PS4 hard drive as the source disk and click on "Next".
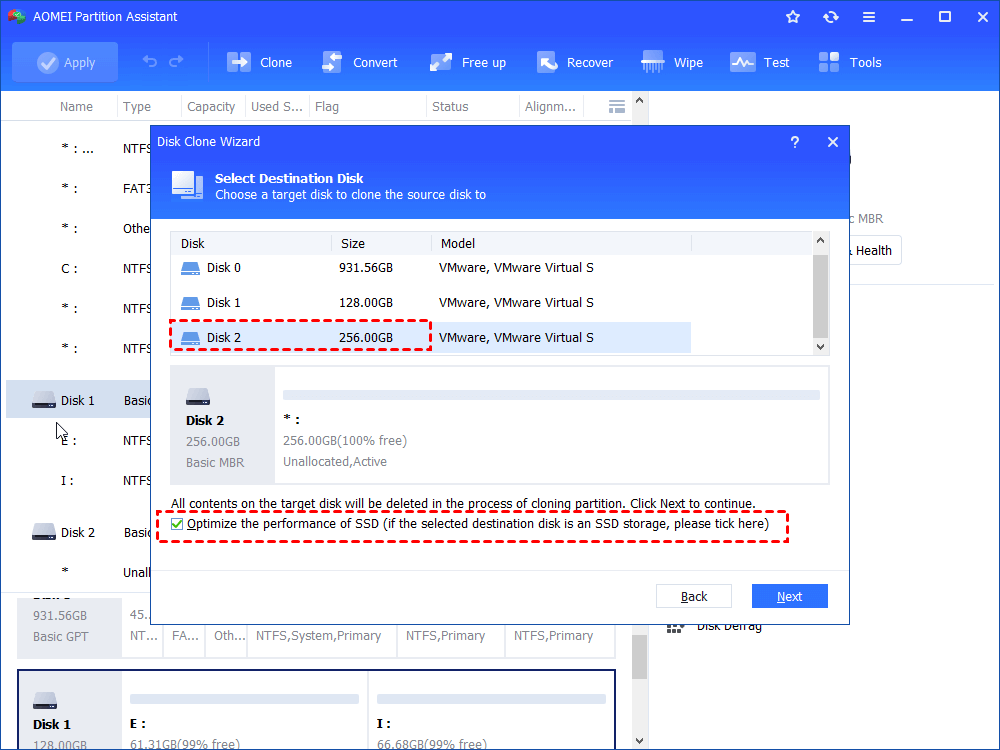
Step 4. Then, choose the new solid-state drive as the destination disk and click "Next" as well. Remember to tick "Optimize the performance of SSD" to align the partition.
Step 5. In this window, you can resize the new partitions on the new hard drive. Click "Next" to move on.
Step 6. Click "Apply" and "Proceed" to commit the operation to clone PS4 hard drive to SSD.
Step 7. Once the clone process is finished, you will get a new hard drive with all your games on it, you can reinstall the SSD into your PS4 game console to begin enjoying the new disk. That's all steps on how to clone PS4 hard drives to SSD without losing data.
To sum up
After you perform the Sony PS4 HDD upgrade, your gaming experience will be greatly improved. Although the steps of uninstalling and reinstalling disk may be a little complex, it's worth.
You can effortlessly clone PS4 hard disk to SSD using AOMEI Partition Assistant Standard without losing any data. If you intend to sell your old hard drive after upgrading, remember to clean the PS4 hard drive, which may also be accomplished with AOMEI software.
Furthermore, if you upgrade to the Professional edition, you will have access to additional capabilities like as recovering missing partitions, converting MBR to GPT without erasing partitions, relocating applications or data from the C drive to the D drive, and so on.


