What to Do Before Switching Hard Drives for Windows PC?
What to do before switching hard drives on a Windows computer? Is it possible to replace an old disk without reinstalling? This guide will teach you how to simply and safely move disks without reinstalling.
By Lucas / Updated on September 4, 2023
Help! What should I do before changing my main hard drive?
“I'm about to replace my internal hard drive, and I just want to know what I need to do to ensure I don't lose everything. I know SSD is better than HDD, but I’m not sure about how to choose the right SSD for my device. How can I back up all the data on my disk? And is it possible that I can avoid reinstalling my Windows 10 and all games and programs? There is too much if I need to reinstall and reset all. Any tools recommend?”
When your computer starts to feel sluggish and storage space becomes scarce, it might be time to consider switching your old hard drive to a new one. Upgrading your hard drive can breathe new life into your system, providing faster performance and increased storage capacity.
In this article, we will explore the essential steps to take before making the switch. We'll delve into why SSDs have the edge over HDDs, and how to select the perfect replacement drive for your needs. Also, you can learn what to do after installing a new hard drive.
If you also want to upgrade the hard disk on your PC but don’t know how to do that, keep reading this article, you can get some inspiration.
Need to switch to a new disk
Before diving into the process, let's understand why upgrading your hard drive is a wise move. Over time, your old hard drive accumulates fragmented data, bad sectors, and general wear and tear that can lead to decreased performance and potential data loss. By switching to a new drive, you can revitalize your system and ensure a smoother computing experience.
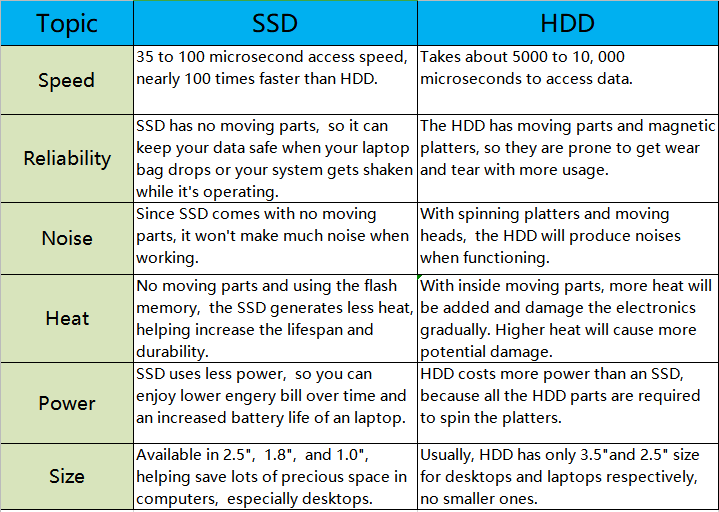
When choosing between an SSD and a traditional HDD, the advantages of SSDs are hard to overlook.
SSDs offer lightning-fast read and write speeds, drastically reducing boot times and application load times. They are also more durable due to their lack of moving parts, making them less susceptible to physical damage. Additionally, SSDs operate silently and consume less power, contributing to a more efficient and quieter system overall.
How to select a suitable new disk
Picking the right replacement drive involves more than just choosing between an SSD and an HDD. You'll need to consider factors such as capacity, form factor, and budget. SSDs come in various sizes, typically ranging from 120GB to 2TB or more. Assess your current storage usage and future needs to determine the appropriate capacity. Keep in mind that the price per gigabyte decreases as the drive's capacity increases.
The form factor is another crucial consideration. Most modern laptops and desktops utilize the 2.5-inch form factor, while M.2 drives are becoming increasingly popular due to their compact size and faster speeds. Ensure your chosen drive is compatible with your system's interface.
Lastly, set a budget for your upgrade. While SSD prices have significantly dropped in recent years, they still tend to be more expensive than HDDs. However, the performance boost and longevity of SSDs often justify the higher cost.
Preparations before making the disk switch
Before you embark on the journey of switching hard drives, certain preparations are essential to ensure a seamless transition. These steps will help safeguard your data and minimize potential hiccups during the process.
1. Backup important files
Backing up your data is non-negotiable. While the chances of data loss during a hard drive switch are relatively low, it's always better to be safe than sorry. Create a comprehensive backup of your crucial files, documents, and important settings.
2. Organize and clean your files
This is the perfect opportunity to declutter your system. Sort through your files and delete any unnecessary documents, old downloads, and duplicate files. A tidy file structure will not only make the cloning process smoother but also save space on your new drive.
How to replace a hard drive
To switch hard drive without reinstalling OS and apps and keep all data, cloning your hard drive is a highly recommended method for transferring your system, applications, and files from the old drive to the new one. It eliminates the need to reinstall the operating system and software, saving you valuable time and effort.
Here, we recommend using AOMEI Partition Assistant Professional. This powerful Windows disk software offers an intuitive interface and a range of advanced features that make the cloning process straightforward and efficient.
AOMEI Partition Assistant Professional has garnered a reputation as a reliable and user-friendly disk management tool. With its advanced data protection technology and seamless cloning capabilities, it's the ideal solution for ensuring a smooth transition to your new SSD.
This software not only simplifies the cloning process but also provides additional features such as partition resizing, disk optimization, and OS-only migration. Its clear interface guides you through each step, making it accessible even for users with minimal technical expertise.
This tool also has the Server Edition for Windows Server 2022/2019/2012/2008/2003 users, and other advance editions for enterprise users.
Step-by-step guide: How to clone your hard drive with AOMEI Partition Assistant Professional
Now, in this part, you can learn how to set your new disk on your computer and how to clone your disk.
Stage 1. Install new disk
After you get the correct disk for you device, shut your computer down and unplug it.
Step 1. Ground yourself before opening the computer. Improper handling of electronic components can cause damage to the system. You can accomplish this by wearing an anti-static wrist strap while standing on an anti-static mat.
Step 2. If you're using a desktop computer, you'll typically need to twist off the screws on the back of the tower and then slide the side panels away from the unit. Some laptops have special doors on the case that allow you to easily insert and remove hard drives. Other models require you to remove the battery and unscrew various components to access the hard drive. Check with your manufacturer to find the correct method for your computer.
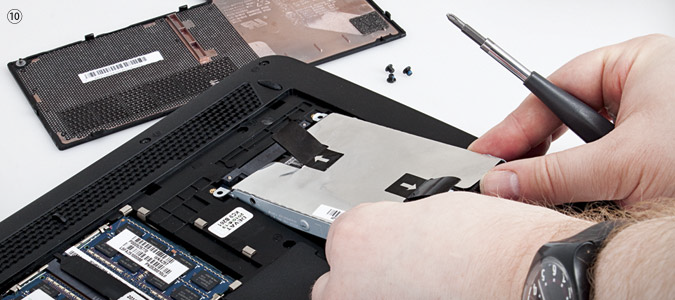
Step 3. If your computer has one more place for another disk, you can directly plug the new disk into it. If not, you may need to use an adaptor to connect the new disk to your PC. If so, you can close your computer case or laptop cover.
Stage 2. Initialize new disk
If it’s a new SSD, you should initialize this SSD first, or it can’t be found on the laptop.
Step 1. In Windows, press the "Windows + R" key, type "diskmgmt.msc" and click OK to launch Disk Management.
Step 2. Find and right-click the disk you want to initialize, and then click "Initialize Disk".
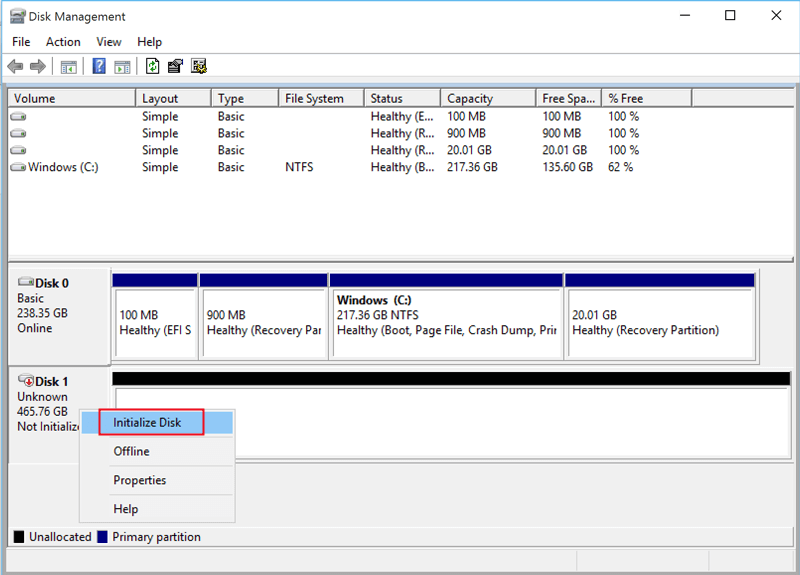
If the disk is listed as Offline, first right-click it and select Online.
Step 3. In the Initialize Disk dialog box, select the correct disk to initialize. And then click OK to accept the default partition style, or you can change the partition style (GPT or MBR) as you want.
Stage 3. Clone old disk to new one
Now, we can start to clone disk.
Step 1. Install AOMEI Partition Assistant Professional and run the program. In the main interface, you’ll see all disks on your computer. To replace hard drive on Windows, you can click Clone -> Clone Disk.

Step 2. When you get into Disk Clone Wizard, you need to select the disk copy method. Here we choose Clone Disk Quickly.

✍ AOMEI Partition Assistant provides two disk clone methods:
● Clone Disk Quickly: only copy the used space of the disk to another disk, and you can clone large hard drive to smaller hard drive, and adjust partition size during the copy progress.
● Sector-by-Sector Clone: copy all sectors of the disk to a target disk no matter it is used or not. It will make exactly same disk as the source disk.
Step 3. Here, select the system disk as the source disk. Click Next.

Step 4. Select the new HDD or SSD as the target disk. Click Next. The operation will delete all data on the target hard drive, so if there is any important data on the disk, click No and backup disk in advance. If no, click Yes to continue.

* If the target disk is an SSD, you’d better check the option of “Optimize the performance of SSD”.
Step 5. Here you can edit the partition size on the target disk according to your needs. Or you can repartition hard drive with AOMEI Partition Assistant after coping. Click Next.

Step 6. It will give you a Note about how to boot computer after clone or migration. Read it and click Finish.

Step 7. Finally, click Apply at the toolbar and click Proceed to execute the task.

What to do after cloning hard drive?
After cloning everything from the old hard drive to the new one, you can shut down the computer. Now, you need to enter BIOS to change boot priority and move the cloned hard disk to the top one of the boot order.

If you are replacing hard drive in Windows laptop, things might become different as some laptop only one hard drive bay. In this case, you need to: Turn off your PC. Open the case, remove the old disk and put in the new hard drive, attach the cables and secure the drive with screws. Clone the case, turn on the power and it will boot from the cloned hard drive.

Further tip: What to do with old hard drives after hard disk upgrading?
Congratulations on successfully upgrading your old disk! Now, let's see what you need to do for your old disk.
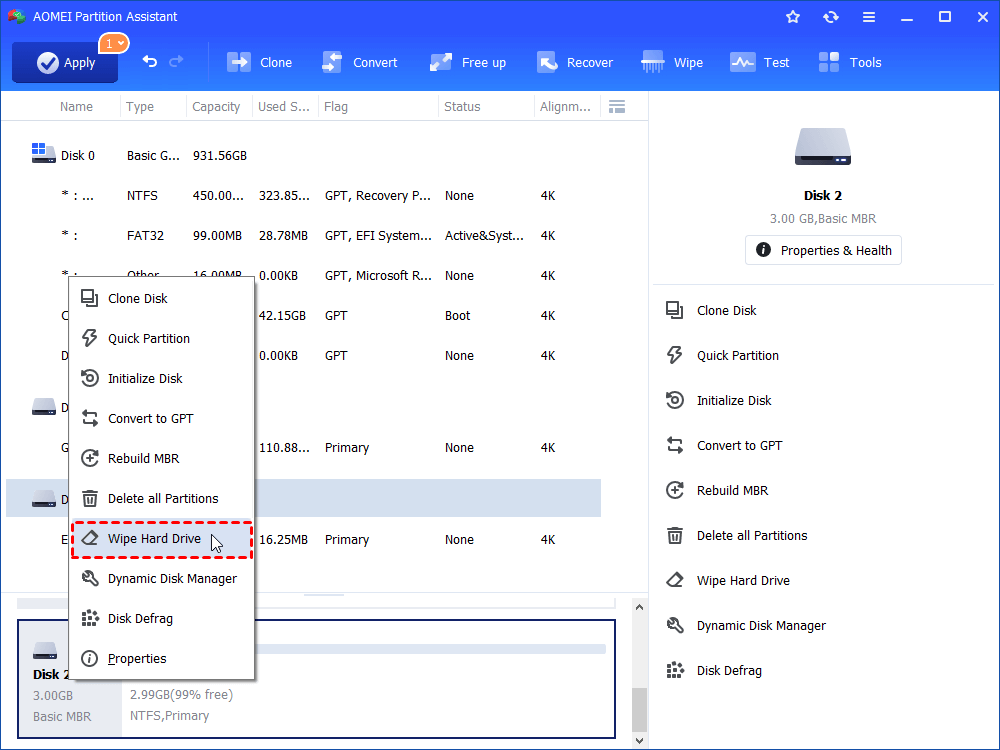
If you wish to dispose of or sell old hard drives, the first step is to fully erase all data on the disk. Wiping a hard drive is the process of erasing and overwriting unnecessary data on the disk in order to prevent data recovery. As a result, you cannot simply trash or format your old hard drives; these two processes will not preserve your privacy.
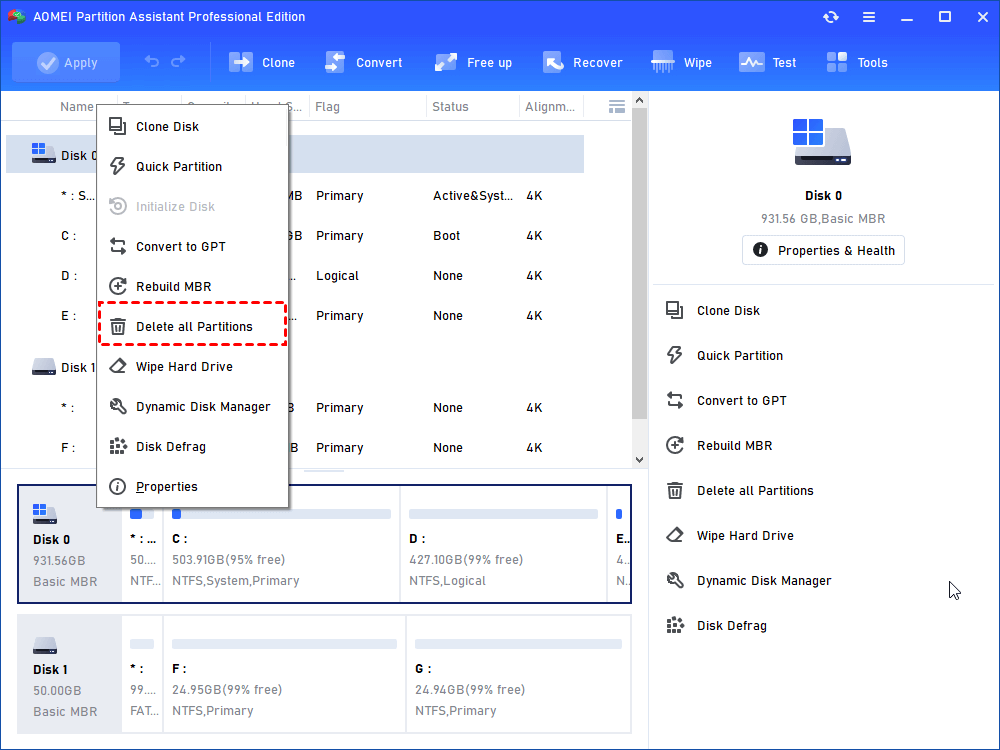
AOMEI Partition Assistant Professional is also a disk wiper. The “Wipe Hard Drive” feature offers you easy operations to overwrite the hard drive. You can select a hard drive that you want to wipe; right-click on it and choose the "Wipe Hard Drive" option. Choose a wiping method to wipe the selected hard drive according to your requirements and click "OK". Click "Apply" in the toolbar to execute the operation.
Also, you can reuse your old disk as your data disk. You just need to delete all partitions.