About SSD
SSD is short for Solid State Drive which is a new type of hard disk. It uses non-volatile memory ships to store data as HDD. But compared with HDD, there is moving part in SSD which makes SSD has faster loading time and data accessing time. Due to the advantages of SSD and the users’ high demands for speed, more and more people are trying to replace HDD with SSD to get fast speed.
As for most of users, they don’t want to reinstall system when they replace HDD with SSD. Therefore, they do their best to look for a more convenient way. May be most of users have tried Samsung Migration, but sometimes they aren’t allowed to migrate HDD to SSD due to some reasons, such as the size of SSD is smaller than the used space in HDD. What can you do in this situation? Just give up the replacement and reinstall system? In fact, there is a better way for you to solve the troublesome issue.
Migrate HDD to SSD with AOMEI Partition Assistant Professional
AOMEI Partition Assistant Professional is a third-party partition management software, which supports 32 bit or 64 bit of Windows 8.1, Windows 8, Windows 7/Vista and Windows XP. It enables you to only migrate OS to SSD, or Clone the whole hard disk to SSD. If the size of your SSD is smaller than the used space in HDD, you can only move OS to SSD and keep other data still on HDD. If your SSD has enough space, you can clone the whole HDD to SSD.
Besides these functions, it can also help you allocated free space, make conversion between Dynamic disk and Basic disk, convert between primary partition and logical partition, make bootable CD and more other useful feature. It is an all-in-one software for your partition management.
Migrate OS to SSD
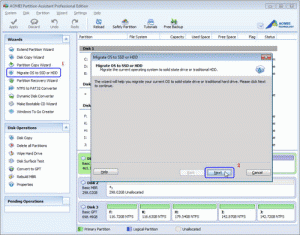
Step1: Download, install and launch the software. choose Migrate OS to SSD or HDD on the left bar and then click Next.
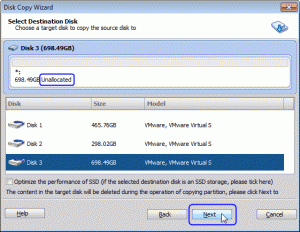
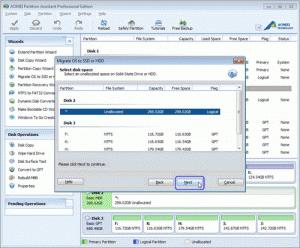
Step2: Choose the unallocated space on your SSD as destination and then click Next
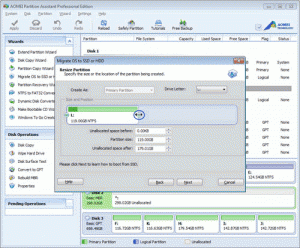
Step3: In this window, you could modify the information (including size, location, and drive letter) of the partition on new disk, of course, you can keep default settings. Then click Next to note about “Boot Operating System”. And then click Finish to back to the main interface.
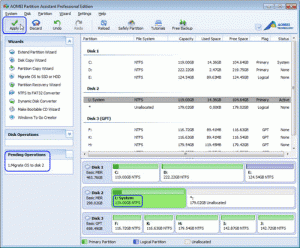
Step4: In the pop-up window, click Apply to perform all the operations.
Note:
- This operation involves the system partition, so the operation will be completed under the PreOS Mode.
- If you would like to migrate OS from MBR disk to GPT disk, make sure your motherboard supports EFI or UEFI boot.
- If you migrate OS between MBR and GPT disks, please enter BIOS and change boot setting (about boot setting, please check your motherboard or computer manual) when OS migration is completed.
Clone Hard Disk
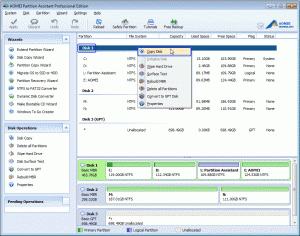
Step1. Install and launch AOMEI Partition Assistant. Right click the source hard disk (here is Disk 1) you want to copy and select “Copy Disk” in the drop-down menu.
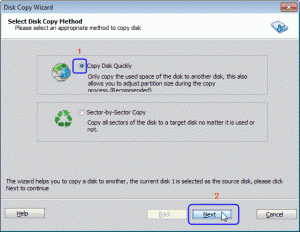
Step2. In the pop-up window, select the method you want to copy disk (here we choose “Copy Disk Quickly”). Then click “Next” to continue.
Step3. In next window, select the destination disk (unallocated space) to put the data of source disk on, and then click “Next”. When you choose the target disk, pay attention to its size; make sure that its size is not less than the size of the data you are going to copy, at least equal to the latter.
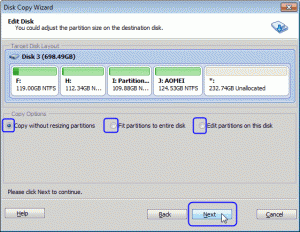
Step4. In this window, this program allows you to adjust the partition size on the destination disk. There are three options for you: “Copy without resizing partition”, “Fit partition to entire disk” and “Edit partition on this disk”. After finishing the adjustment, please click “Next”.
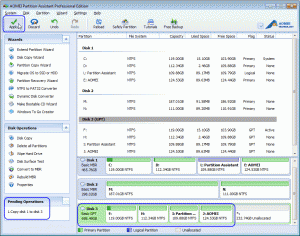
Step5. You can preview the disk cloning operating by viewing the “Pending Operations”. To commit the “Pending Operations”, please click “Apply”.
Note:
- The hard disk you want to clone contains system boot partition; the operation will be completed under the “PreOS Mode“.
- You can tick “Optimize the performance of SSD” to improve the reading and writing speed of SSD in step3.
