How to Clone Hard Disk to SSD or HDD with AOMEI Partition Assistant
AOMEI Partition Assistant allows you to clone hard disk to SSD or larger HDD with ease and boot from it without issues. Please refer to this page to learn how it works!
Why need to clone the hard disk?
Cloning a hard drive has various advantages that make it a simple approach to making the most of your storage solutions. It allows you to make a one-to-one clone of your hard disk, which is handy for backing up or transferring data. Even better, you can transfer over your Windows installation with all of your preferences and settings intact to a larger HDD or SSD.
You can easily realize:
▶ Upgrade to SSD or larger HDD without Apps and OS reinstallation
PC performance is critical for all users, but it is especially critical for those that push their PCs to their limits, such as gamers, video editors, engineers, and other creative professionals.
If you value speed and efficiency, you'll probably want to use an SSD or larger HDD. Cloning disk can free you from reinstalling the Windows system and all installed programs, which saves a lot of time and energy.
▶ Back up system and data for safety
Through disk clone, you can get an exact backup of what is stored on your hard disk in use. Thus, you can quickly replace the old hard drive with the cloned one if the current disk is failing.
A handy hard drive cloning software for Windows PC--AOMEI Partition Assistant
Some might say they can use "Copy" and "Paste" to transfer data, but there're many data files that are unmovable and hidden files of the system you can't find. Without knowing the function of the disk clone, users will suffer tedious work, and even damage the disk.
AOMEI Partition Assistant Professional is a cloning software specifically developed for Windows PC users. It can help users easily and securely clone HDD and SSD to the target disk for disk upgrading or backup. With the help of AOMEI Partition Assistant, cloning is simple work. This software can work with Windows 11/10/8.1/8/7, XP, and Vista. It works well in:
✦ Cloning only the used sectors of the hard disk to new one, so you can clone a larger HDD to a smaller SSD.
✦ Cloning hard disk with bad sector.
✦ It allows you to resize the partitions on the disk before cloning starts.
✦ Automatically making 4K alignment for SSD during the cloning process.
Prerequisites for disk clone
- First, you need to install the second hard drive to the PC. The destination drive space should be equal or larger than the used space on the original drive. You can either connect the destination drive internally or externally via USB connector during disk clone.
- To make a bootable disk clone, please download and install AOMEI Partition Assistant on the current running computer.
- If the destination drive has a different disk type (MBR/GPT), it is recommended to set the disk type of the new hard disk to be the same as the source hard disk. Please check how to convert from MBR to GPT or GPT to MBR.
If you want to clone a data drive, you can directly use the Standard version. It is a paid feature to clone a current running system drive. Please upgrade to AOMEI Partition Assistant Professional, Server, or above versions to use the feature. It is free to clone a data drive.
A step-by-step guide on how to clone hard disk
Then, how to clone the disk with AOMEI Partition Assistant? Please follow the text below.
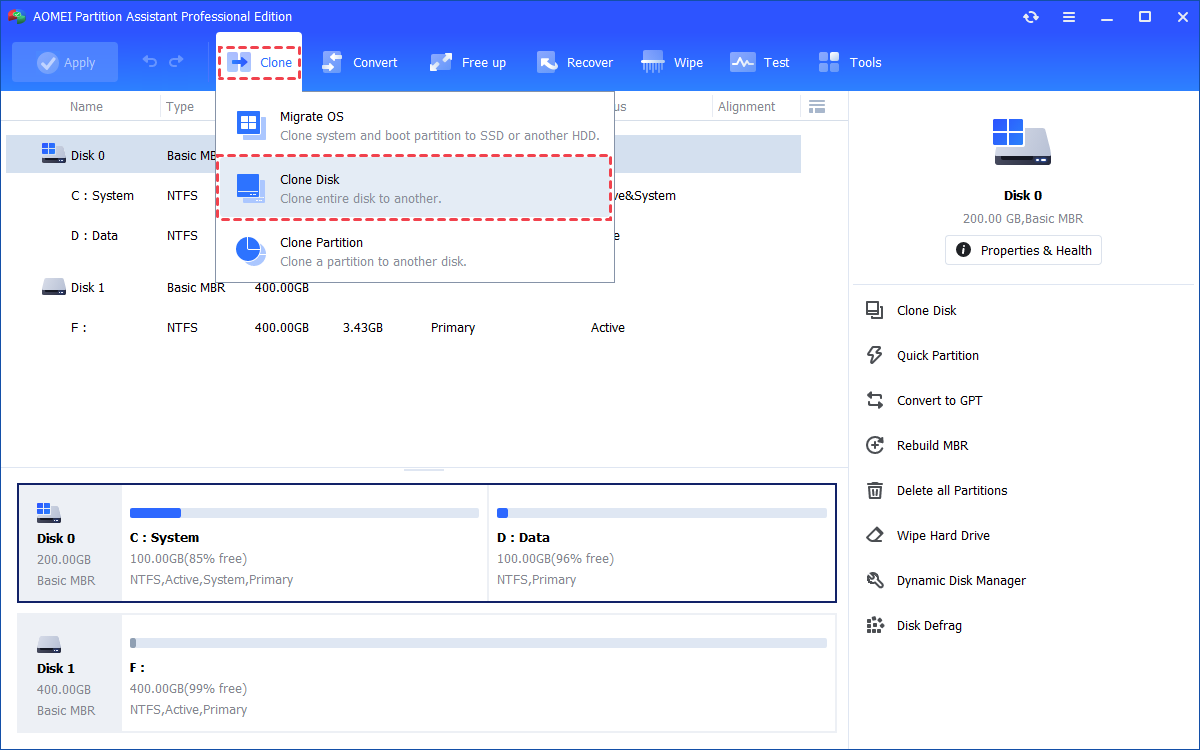
1. Install and launch AOMEI Partition Assistant, click the "Clone" main tab and select "Clone Disk". (You can also right-click the Disk you want to clone and select the "Clone Disk" tool to run disk clone.)
Tip: If you need to migrate OS to SSD while keeping files on HDD, then you can click "Migrate OS to SSD" feature.
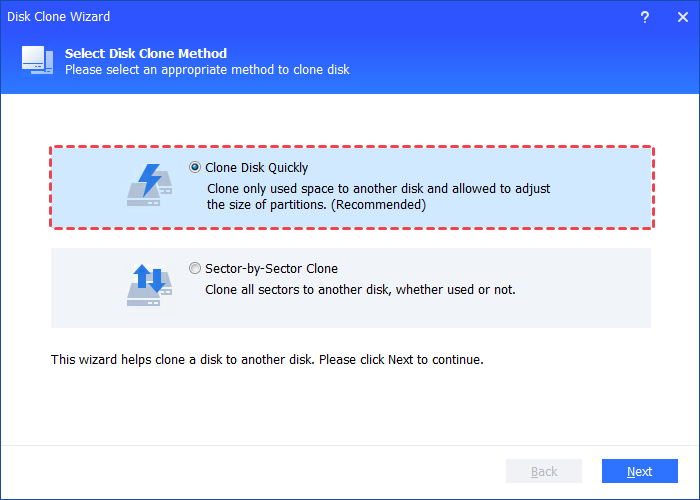
2. In the pop-up window, there are 2 methods available to clone the drive. Please select one as per your needs. "Clone Disk Quickly" only copies the used space of the disk so you can clone to a smaller disk. "Sector-by-Sector Clone" will copy all sectors of the disk no matter whether it is used or not, which requires the destination disk space to be equal or larger than the whole original disk space.
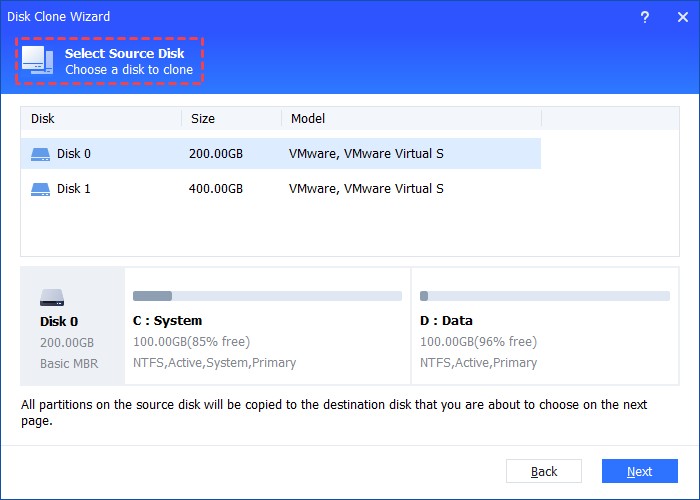
3. Choose the hard disk that you need to clone as the source disk and click "Next".
Tips: To make a bootable disk clone, please select the system drive of the current computer with Partition Assistant installed as the source drive.
4. Select the destination disk to put the data of the source disk on, and then click "Next".
Tips: You can tick "Optimize the performance of SSD" to improve the reading and writing speed of SSD if the selected destination disk is an SSD storage.
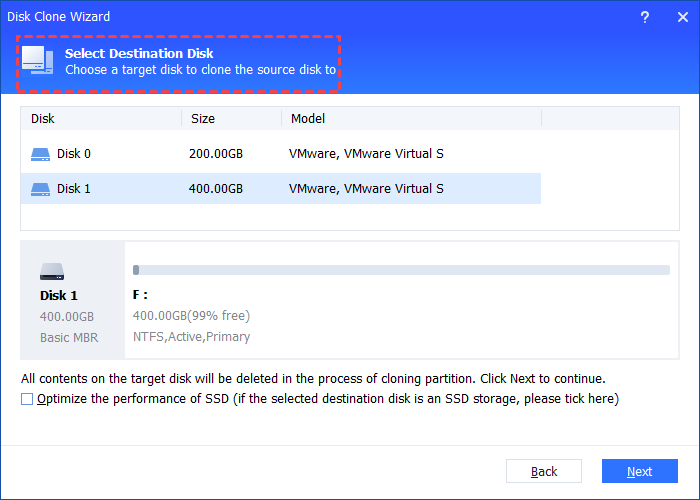
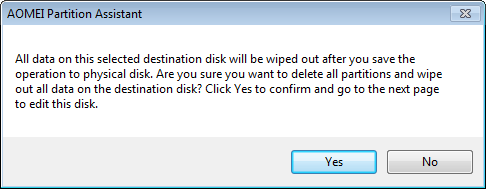
5. After you click the "Next" button, a message window will pop up. All data on this selected destination disk will be wiped out after you save the operation to physical disk. If there is important data on the destination drive, please make a backup in advance. Click "Yes" to continue.
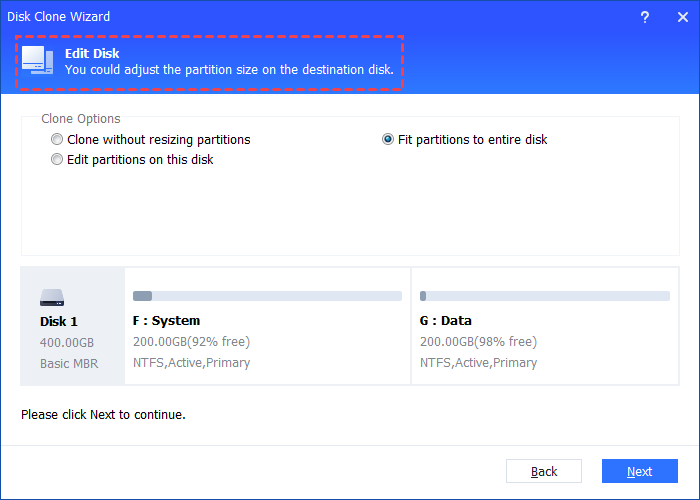
6. In the next window, this program allows you to adjust the partition size on the destination disk.
There are three options for you: "Clone without resizing partition", "Fit partition to entire disk" and "Edit partition on this disk". After finishing the adjustment, please click "Next".
At the button of the interface, you can preview the result of cloning under different edit disk options.
Tips: If you clone to a smaller SSD, the first option is grayed out. If you select Sector-by-Sector Clone, it is unable to adjust the size on the destination disk.
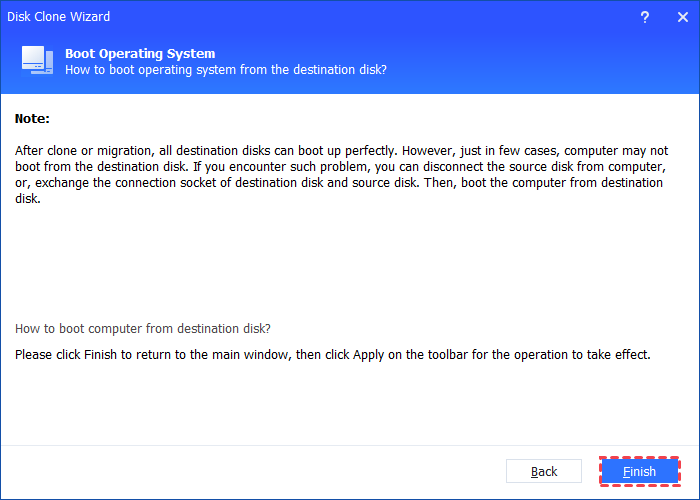
7. Then, a note message window will pop up. Please click "Finish" to continue.
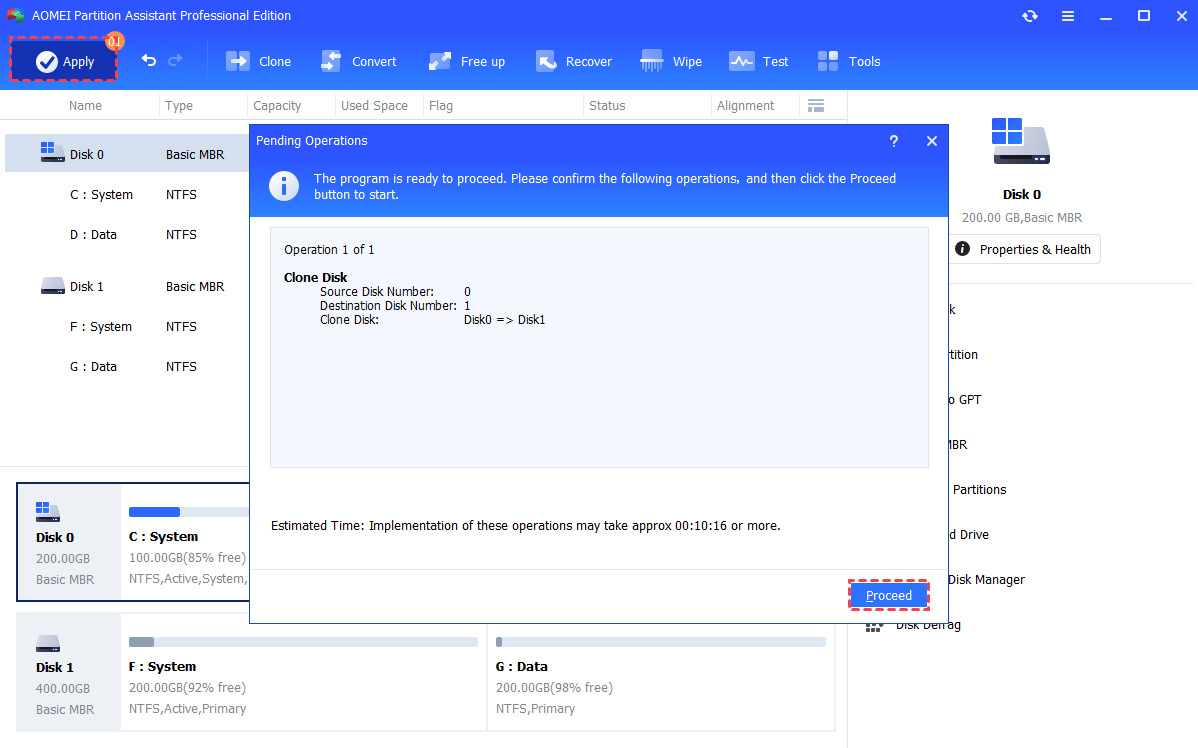
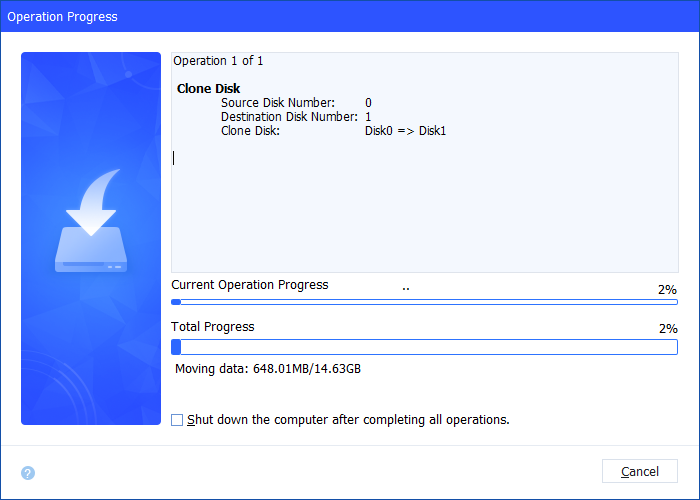
8. You can preview the disk cloning operating by viewing the "Pending Operations". To commit the "Pending Operations", please click "Apply" and "Proceed".
9. The cloning process will start and you can check the cloning process.
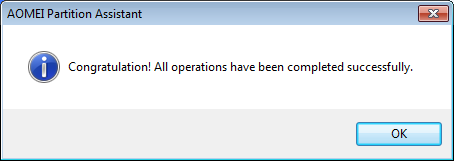
10. Once the process is completed successfully, you will get a congratulation window.
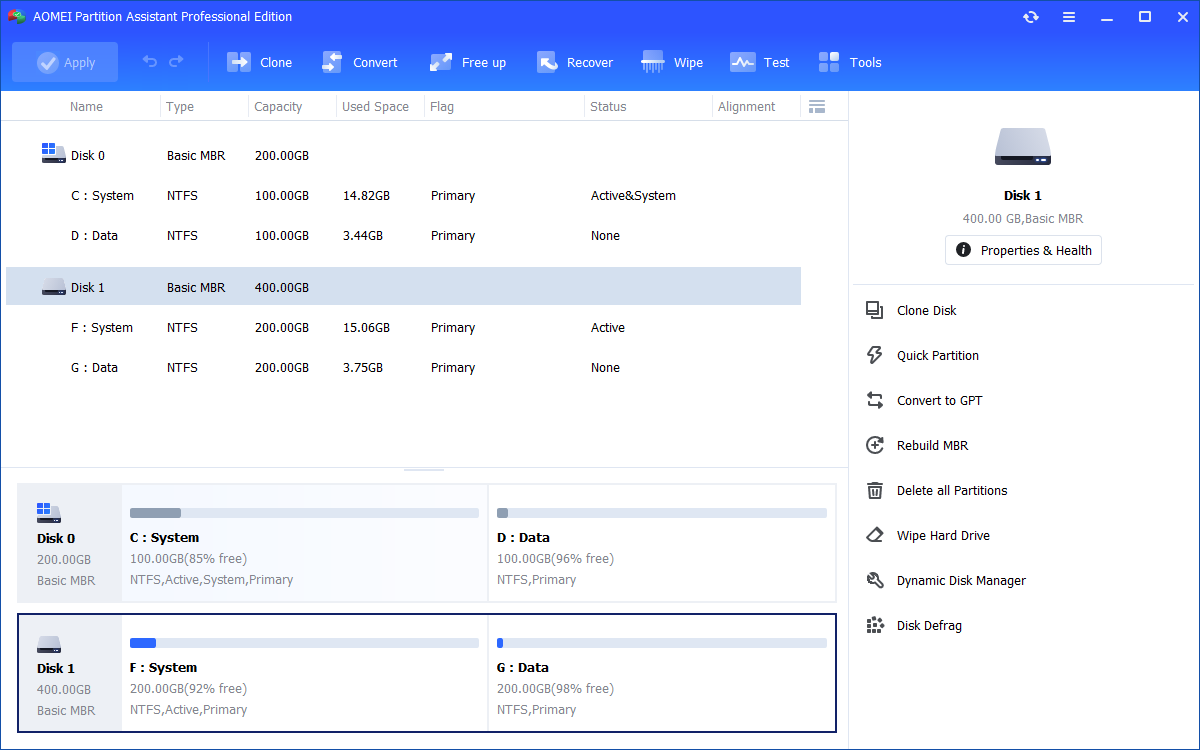
As a result, you can check the partitions layout on the destination disk will be identical to the source disk.
Conclusion
Once the disk clone process is finished successfully, you can use the cloned drive to replace the original system drive of the current computer. To ensure the destination disk is accessible and bootable after cloning process, you should install the target disk internally.
This feature is mainly used to clone a current system drive to a larger HDD or SSD so that you can replace the system drive with a larger HDD/SSD. In this way, you will get better computer performances.
Definitely, you can also use the feature to clone a data drive in order to copy files/folders from the source drive to another drive. It will save much of your time than simple file copy and paste.
To boot Windows from the new disk, you need to restart the computer, enter the BIOS Settings and change the boot drive.

That's the whole process of using AOMEI Partition Assistant to clone hard disk. With it, you can easily clone disk and boot from it successfully. Besides that, it has many more great features like move installed applications to another drive, allocate free space, convert dynamic disk to basic, etc.
Notes:
-
To ensure the destination disk is accessible and bootable after cloning process, you should install the target disk internally. And, if the source disk and target disk are of different types (one uses MBR mode and the other uses GPT mode), you have to modify the boot mode in BIOS/UEFI when you boot from the target drive.
-
The time to complete a disk clone task depends on the size of the source disk. Besides, the following aspects can also influence the operation speed: USB connection, bad sectors on the source or target disk, old computer configuration, etc.
FAQs:
Q: Can I connect the destination drive via a USB connector during disk clone?
A: Yes, you can connect the destination drive via a USB connector during disk clone. But after successful disk clone process, please connect the cloned drive internally to boot from it.
Q: After disk clone, will the source system be deleted or not bootable?
A: Disk clone won’t take any effect on source system.
Q: After disk clone, how to change the drive letter of the system partition on the destination disk into C:?
A: When you boot from the cloned drive, Windows will assign letter C to this partition automatically, so you can't manually assign letter C to the partition.